


I have been fortunate to learn from and operate with talented surgeons from the United States and around the world. Each time I operate with someone new, I absorb as many valuable tips as possible to take back to my practice and try out so I can see if they harmonize with my existing surgical maneuvers. My video (watch below) highlights the pearls I’ve collected during my years of practice, focused on a few initial steps of cataract surgery. A writing marker overlay is used to emphasize the key concepts. For a supplementary video, scan the to the right.
PEARLS BY SURGICAL STEP
No. 1: Paracentesis. I like to place a universal 0.12-mm forceps on the sclera opposite a 1-mm paracentesis blade (Figure 1). The resultant tripod fixation provides better stability than a two-point fixation technique. I tend to avoid the use of a Thornton ring because in my opinion it has too many points of contact. The device is great for stability, but it can increase the risk of subconjunctival hemorrhage and create more redness than usual postoperatively, which I then need to explain to the patient.
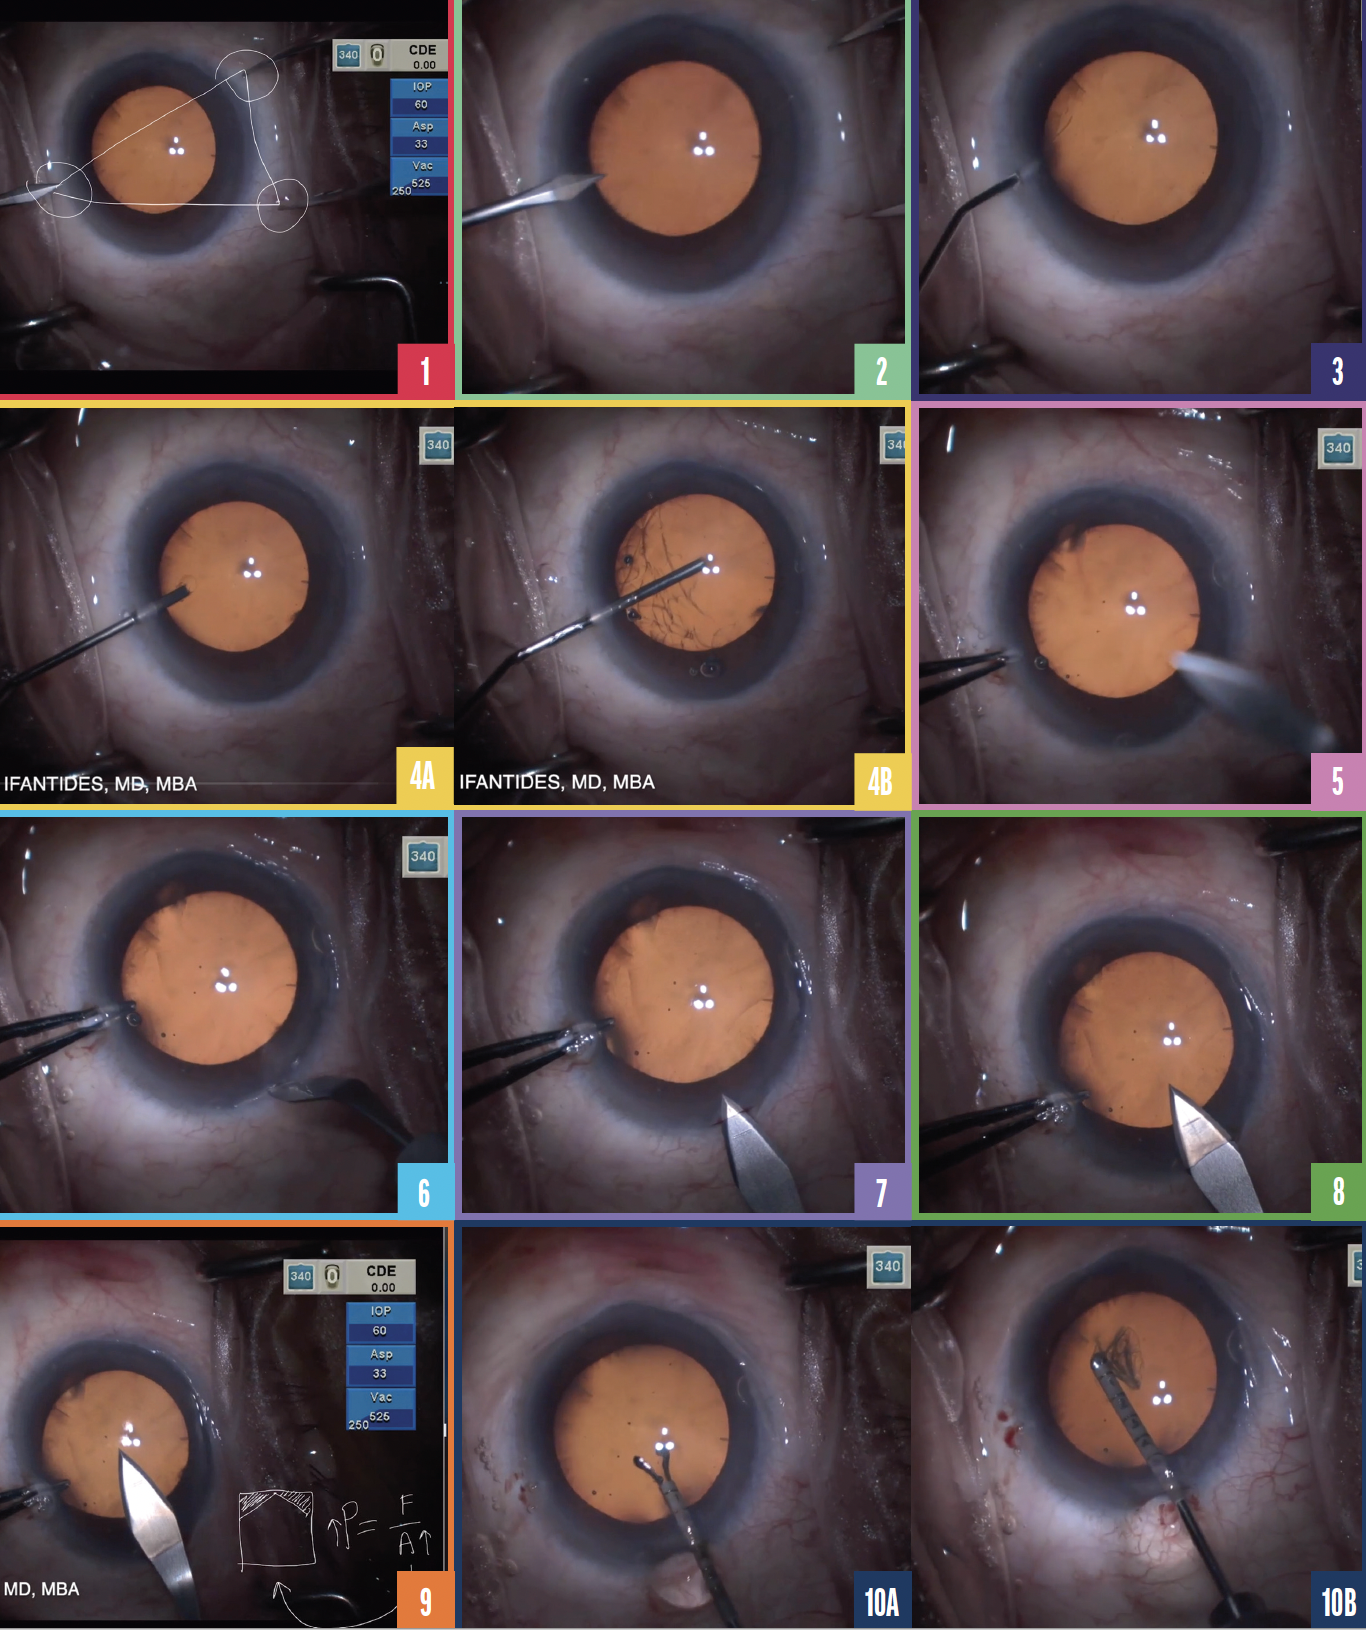
Figure 1. Three-point tripod fixation is created by placing 0.12-mm forceps on the sclera opposite a 1-mm paracentesis blade.
Figure 2. A paracentesis is made.
Figure 3. Lidocaine is injected slowly.
Figure 4. An OVD is injected as the cannula is inserted through the paracentesis (A), and the anterior chamber is filled completely (B).
Figure 5. A 0.12-mm forceps is placed inside the anterior chamber through the paracentesis.
Figure 6. A groove is made on the cornea.
Figure 7. Blood is seen around the corneal groove.
Figure 8. A uniplanar square incision is created.
Figure 9. A chevron-shaped incision decreases the area ofthe wound.
Figure 10. The capsulorhexis is initiated (A) and performed (B).
I learned the next tip while operating with Richard J. Mackool Sr, MD. After the paracentesis is made with a 1-mm blade (Figure 2), a small volume of lidocaine is injected slowly (Figure 3). The slow release of the substance is preferable for two reasons. First, it avoids the burning sensation that some patients experience, improving patient satisfaction. Second, it allows better control of the amount of lidocaine entering the eye. We are taught that the volume of the anterior chamber is 250 µL. Recent studies with new imaging technologies, however, show that the actual volume is approximately 170 µL, equating to about three to four drops of lidocaine. A slow release of lidocaine can ensure that the eye is not overinflated. I like injecting a very low volume of lidocaine slowly while observing the patient to avoid pain or discomfort. A second bolus can be used if needed.
No. 2: Inflating the anterior chamber. I like to inject an OVD as the cannula is inserted into the paracentesis (Figure 4). If air bubbles are present, they tend to appear during the initial phase of OVD injection. By starting the injection close to the paracentesis, I can ensure any bubbles will be evacuated through the paracentesis as the OVD fills the remaining portion of the anterior chamber.
No. 3: Corneal groove. With a 0.12-mm forceps placed inside the anterior chamber through the paracentesis for countersupport (Figure 5), a groove is made on the cornea (Figure 6). Creating a corneal groove provides a tight seal at the end of the case. Slight bleeding is typical (Figure 7). I favor seeing this, as it is reassuring to know the circulatory system is close by, providing wound healing and inflammatory cells for infection prevention.
No. 4: Incision. A uniplanar square incision is created to maximize the area of the wound (Figure 8) and reduce the risk of increased pressure, which can cause the wound to leak. A square shape is preferred to a chevron because the latter both decreases the area of the wound (Figure 9) and tends to cause more leakage. This can compromise anterior chamber stability. After these steps of cataract surgery are completed, the capsulorhexis is created (Figure 10).
CONCLUSION
I highly recommend visiting colleagues. They can be a source of inspiration and education. The tips I share in my video are just a sampling of those I have learned from others and by trial and error.