

Posterior capsular rupture (PCR) is an event that all cataract surgeons dread. And no matter how good we are, it’s something all of us will encounter. It is imperative to have a proper game plan, which can be the difference between a lengthy, traumatic case and a smooth, well-executed one. Here is my list of the top 10 to-dos when this happens to you.
TO-DO NO. 1: RECOGNIZE IT Early
You can’t fix something unless you know the problem. Telltale signs of PCR include:
- Loss of followability of lens nucleus pieces;
- Sudden deepening of the anterior chamber (AC); and
- Widening of the pupil.
It is important to understand phaco fluidics in relation to PCR. The capsular bag is an isolated chamber, with the phaco handpiece as the sole source for fluid outflow when aspiration and vacuum are activated. When the bag is ruptured, this creates a new and competing source of outflow, which causes poor followability of lens material to your handpiece. Vitreous can also clog the port and cause a loss of followability, but this is a later sign.
Even with early recognition, you still have to identify the PCR (Figure 1). Where is it? How big is it? How much lens material is left in the eye? You must analyze these factors quickly over the course of only seconds.
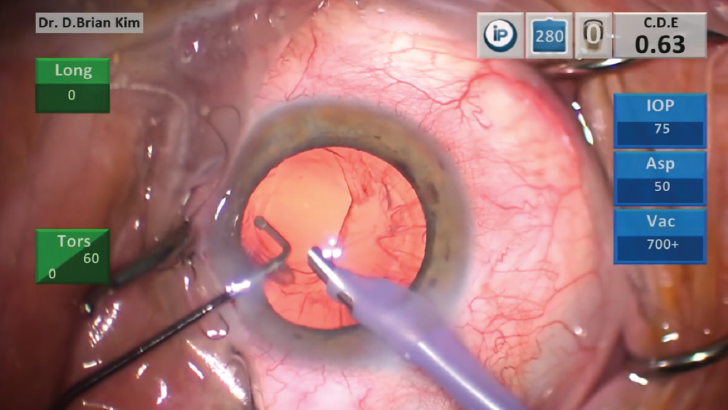
Figure 1. A visible posterior capsular rupture.
TO-DO NO. 2: REMEMBER, OVD IS YOUR FRIEND
Once you identify the tear, you must maintain irrigation to avoid chamber collapse—but not for too long because the irrigation fluid can cause two problems: (1) The fluid can cause more lens pieces to get pushed out of the bag and into the vitreous space, and (2) the fluid can hydrate the vitreous and cause the posterior space to expand and shallow the AC.
Before you withdraw the irrigation handpiece, you should inject a dispersive OVD into the AC. A word of caution: Do not inject the OVD indiscriminately. First, try to inject it through the PCR directly; this means placing the tip of the OVD cannula beyond the PCR carefully and injecting OVD, forming a tamponade to prevent the vitreous from coming forward. Second, after you are sure there is enough OVD plugging the PCR, you should inject more OVD in front of the tear and into the AC.
OVD on a cannula can also be used to move and secure retained lens fragments to prevent them from falling into the vitreous space. It is important not to overfill the AC, or you will risk stretching the capsular bag and worsening the PCR. Like Goldilocks’ porridge, the injection of OVD must be just right.
OVD helps to stop the clock, so to speak. At this juncture, you can take a deep breath, calm your nerves, analyze the situation, and formulate a solid plan of action.
TO-DO NO. 3: RHEXIS TO THE RESCUE
The PCR can expand with further manipulation, which not only limits options for IOL placement but also invites more vitreous into the AC. If possible, creating a posterior continuous curvilinear capsulorhexis (PCCC) will help to control the PCR (Figure 2). Performing your first PCCC can be intimidating, but you have to start somewhere. Because the posterior capsule is much thinner than the anterior capsule, it takes some finesse and careful technique to master the balance between pulling with forceps and flattening the capsule with the OVD. You should try it only if you have a clear view, so you should first remove any obstructing lens material or vitreous.
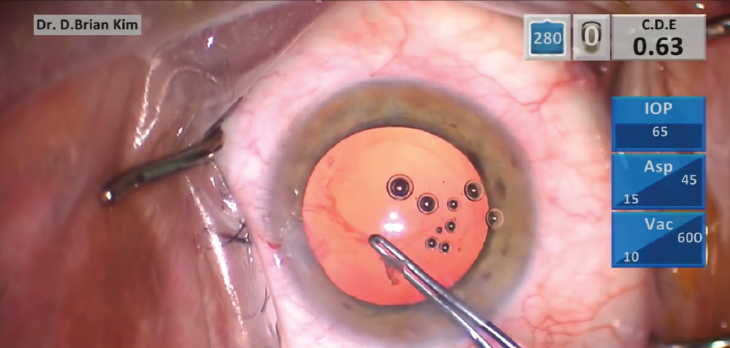
Figure 2. A posterior continuous curvilinear capsulorhexis can help to control the posterior capsular rupture.
TO-DO NO. 4: COMPARTMENTALIZE
If there is significant lens material left in the capsular bag at the time of the break, you can use a dispersive OVD to separate prolapsed vitreous from the lens material. Some surgeons use a lens glide to block the access between the anterior and posterior segments. Others may place a three-piece IOL in the ciliary sulcus to block nuclear fragments from falling; this is called the IOL scaffold technique.
Under OVD, you can even manipulate small pieces with a cannula toward the main incision and burp them out of the incision. If you have identified the PCR early and before vitreous presents itself, the OVD can help you to isolate and then emulsify the pieces carefully using a low-flow setting (ie, low irrigation pressure and slow aspiration rate).
You can remove epinuclear and cortical material with the vitrector on your phaco machine using the irrigation-aspiration-cut setting. Alternatively, you can use a dry aspiration technique, such as with a 27-gauge cannula, and pull the plunger back to remove cortex. Stubborn cortex attached to the anterior capsule can be liberated with the use of a Singer Sweep (Epsilon USA). Manually removing lens material in this fashion is a safe and controlled approach.
TO-DO NO. 5: APPROACH FROM THE BACK
Vitreous always finds the path of least resistance, and our limbal incisions tend to attract it. Prolapse of vitreous to the wound can cause complications such as a peaked pupil, chronic inflammation, cystoid macular edema (CME), or a retinal tear from traction on the vitreous base. Vitrectomy can be performed either from an anterior or posterior approach, but it makes the most sense to place the incisions posteriorly so that vitreous flows backward and away from the limbal incisions.
I prefer to use a 23-gauge pars plana trocar system. The trocar is placed with a shelved incision, similar in principle to a cataract surgeon’s main incision. I use calipers to mark 3 mm posterior to the limbus, and I use a cotton-tipped applicator to control the eye and push the conjunctiva away. I pierce the sclera about 2 mm away from the 3-mm scleral mark and tunnel through sclera toward the mark at a tangential angle, taking care not to enter too early. Once I reach the mark, I turn the handle of the needle perpendicular and puncture into the vitreous space. As the needle is withdrawn, the trocar should remain in place. Nowadays, with the availability of valved trocars, vitreous should not leak out of the sclerotomy. If the incision is created correctly, it will self-seal upon removal of the trocar.
The vitreous is invisible, but intracameral injection of a miotic (eg, carbachol) or triamcinolone acetonide can help you to visualize it. Constricting the pupil will cause a peaked appearance if there is vitreous to the wound, and the white triamcinolone crystals will coat the vitreous for better visualization and removal.
For irrigation, you can place the infusion at the pars plana, but, in this situation with a PCR, I recommend placing an anterior chamber maintainer (eg, 23-gauge Centurion Ultravit, Alcon) through a limbal incision. This helps to direct the fluid currents from anterior to posterior, which is what we want to help keep the vitreous back.
TO-DO NO. 6: DECIDE WHERE TO PUT THE IOL
Ideally, an IOL in the bag is best. If there is a small PCR or PCCC, situating a one-piece acrylic IOL within the capsular bag is the best choice. The slow unfolding and pliable nature of the material allow it to be placed easily in the bag with relatively little trauma. If the PCR is too big, however, such a lens is not recommended because it could be subject to late IOL decentration or dislocation unless you can secure it with reverse optic capture.
If the capsulorhexis is small enough, reverse optic capture is a great way to stabilize a one-piece acrylic IOL in the bag. Alternatively, a three-piece IOL can be placed into the ciliary sulcus, preferably also with optic capture. When the bag is unsalvageable, I prefer intrascleral haptic fixation using the three-piece hydrophobic CT Lucia 602 lens (Carl Zeiss Meditec).
TO-DO NO. 7: A LITTLE PI GOES A LONG WAY
Any IOL placed outside the bag can lead to pupillary block or varying degrees of uveitis-glaucoma-hyphema syndrome. A surgical peripheral iridectomy (PI) can be created simply and efficiently with the vitrector.
My settings for this maneuver on the Centurion Vision System (Alcon) are listed in the accompanying box on page 58. These low-flow and low-cut settings permit the surgeon to perform a safe and controlled PI. The vitrector is placed over the peripheral iris and then rotated port-down. As the pedal is pressed, it will initiate irrigation, then aspiration and vacuum. Once occlusion is reached, the pedal is further pressed to initiate the cutter. You will have exquisite control over the size and location of the PI.
TO-DO NO. 8: REFER
Any time a PCR occurs, the patient should have a thorough peripheral retinal examination to rule out retinal trauma. If lens material has fallen into the vitreous space, the patient should be carefully monitored for inflammation, CME, or high IOP. If any such complications arise, or if the patient needs more reassurance, referral to a retina specialist is strongly recommended.
TO-DO NO. 9: RECORD
PCR happens infrequently. As a result, it can be difficult to process exactly how and why it occurred. Because it can be difficult to troubleshoot in the moment, it is essential to record your surgical cases. To watch a video of a sample PCR case, visit bit.ly/briankim1018. In my opinion, intraoperative video recording is a must-have tool, not only to help you identify problems but also to help you develop new habits and to become a better surgeon.
SETTINGS FOR PERFORMING PERIPHERAL IRIDECTOMY WITH THE VITRECTOR
- Aspiration flow rate: 12 cc/min with linear control
- Vacuum: 350 mm Hg with linear control
- IOP: 50 mm Hg
- Vitrector speed: 30 cpm
TO-DO NO. 10: THE BEST SURGICAL PLAN IS THE BEST PRESURGICAL PLAN
We should not react to PCR as if the house is burning down. Rather, we should respond calmly. But we can do that only if we have prepared beforehand. A PCR protocol that includes whatever you will need should be on standby before every case.
CONCLUSION
PCR does not occur frequently, but when it does it’s scary for any surgeon. Knowing the telltale signs, being adequately prepared with the necessary strategies and tools, and keeping a level head are essential steps to ensuring a successful outcome.