

Removal Techniques for Different IOL Platforms
Nicole R. Fram, MD

IOL exchange can be daunting depending on the IOL design and material, amount of capsular fibrosis, and status of the posterior capsule. The pressure to perform the procedure is increased by the patient’s expectation of postoperative emmetropia. Clear preoperative communication with patients, surgical planning with simulation, anesthesia considerations, and scheduling adequate case time can make a complex situation seem routine. Understanding various surgical approaches for IOL exchange depending on IOL design and material, competency in anterior vitrectomy techniques and familiarity with secondary IOL fixation will increase successful IOL exchange.
CONSIDERATIONS
Anesthesia. Administering a retrobulbar/sub-Tenon block can improve patient cooperation. Quick and unexpected movements by the patient can result in significant zonulopathy, requiring maneuvers you may not have been expecting.
Basic technique. A bevel-down 23- to 30-gauge needle, fine spatula such as a Donnenfeld femtosecond spatula (Katena), or Palay IOL Exchange Cannula (Walcott Rx) or McCabe 25-Gauge Femto Visco Paddle Cannula (Storz/Bausch + Lomb) filled with an OVD is used to free the anterior capsule from the IOL. Next, an OVD and blunt spatula are used to dissect the optic-haptic junction and create a plane for haptic removal. Watching for overfill of the anterior chamber with an OVD is critical to avoid inadvertant iris prolapse. Repeatedly removing or burping OVD during viscodissection helps avoid this potential complication.
Lift the optic-haptic junction just before rotating the IOL to assess the amount of fibrosis along the haptic and within the bag equator. If fibrosis prevents rotation of the haptic, the haptic can be amputated using a 23-gauge microsurgical scissors and left in the capsular bag with the cut ends fully covered by the anterior capsule. This prevents interaction of the haptic with the posterior iris and transillumination defects due to iris chafing. Iris hooks can facilitate direct visualization and inspection of the fibrotic area near the equator of the capsular bag.
For a bag-to-bag IOL exchange, remove the contents of the bag entirely to avoid asymmetric placement of a new IOL. It is often helpful to amputate the haptics with 23-gauge–equivalent microscissors, remove the bulk of the optic, and then remove the haptics with a bimanual and countertraction approach (related video). Before implanting the new IOL in the capsular bag, use an OVD and blunt spatula to confirm that the equator of the bag is open and the new IOL can fully expand in the bag.
The Packer/Chang 19-gauge microscissors (MicroSurgical Technology) can bisect most hydrophobic and hydrophilic acrylic IOLs. Typically, the optic is held using a 23-gauge serrated microforceps through a paracentesis approximately 90º away from the main incision. A folding technique can also be performed by placing a spatula under the IOL 180º away from the main incision and folding forceps through the main incision in the setting of an open capsule and/or excessively dilated pupil. Alternatively, the IOL can be cut almost to the full edge of the optic and removed from the eye either with a Pac-Man or cartwheel technique. Avoid uncontrolled twisting of the trailing portion of the IOL posteriorly because it can damage the iris and cause iridodialysis and bleeding. The twist-and-out1 and modified twist-and-out2 techniques allow the IOL to be removed through a 2.4-mm clear corneal incision with very little instrumentation. I, however, prefer a controlled bi- or trisection with microsurgical instruments through a 2.4- to 3-mm clear corneal incision (depending on the lens material) to avoid stretching the wound and inadvertent damage of the endothelium.
ONE-PIECE ACRYLIC HYDROPHOBIC IOLS
AcrySof/Clareon platform (Alcon). This family of IOLs can be challenging to remove for two reasons. First, the anterior capsule can adhere to the IOL owing to fibronectin reaction. Second, fibrosis can occur along the haptic and terminal bulbs at the equator of the bag. Careful viscodissection and blunt dissection can free up the areas without compromising the zonules. If the haptics are not easily freed during a bag-to-bag exchange, first they are amputated, then the optic removed, and thereafter the fibrosed haptics are removed. Often, bimanual countertraction is helpful using 23-gauge serrated forceps to hold the haptic in combination with a Sinskey hook, blunt spatula, and/or capsule retractors to protect the zonule (Figure 1).
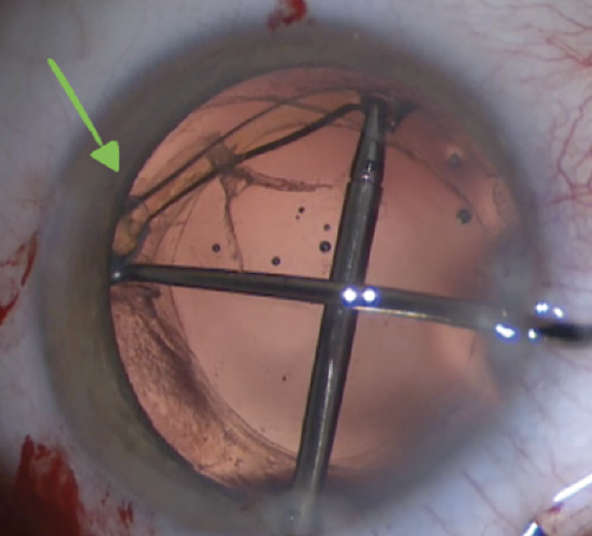
Figure 1. Fibrosis is seen around the terminal bulb (green arrow). A bimanual approach is used to remove the haptic from the capsular bag.
Tecnis platform (Johnson & Johnson Vision). This family of IOLs can be freed from the anterior capsule during viscodissection depending on the amount of anterior capsular fibrosis. Typically, the fibrosis is at the haptic-optic junction notch and intermingled with the anterior capsular edge. Sometimes, it is necessary to cut the adhesions carefully with 23-gauge scissors to free the haptic. The 23-gauge microscissors from MicroSurgical Technology have a unique blunt end that is helpful for delicate intraocular maneuvers (Figure 2; related video).
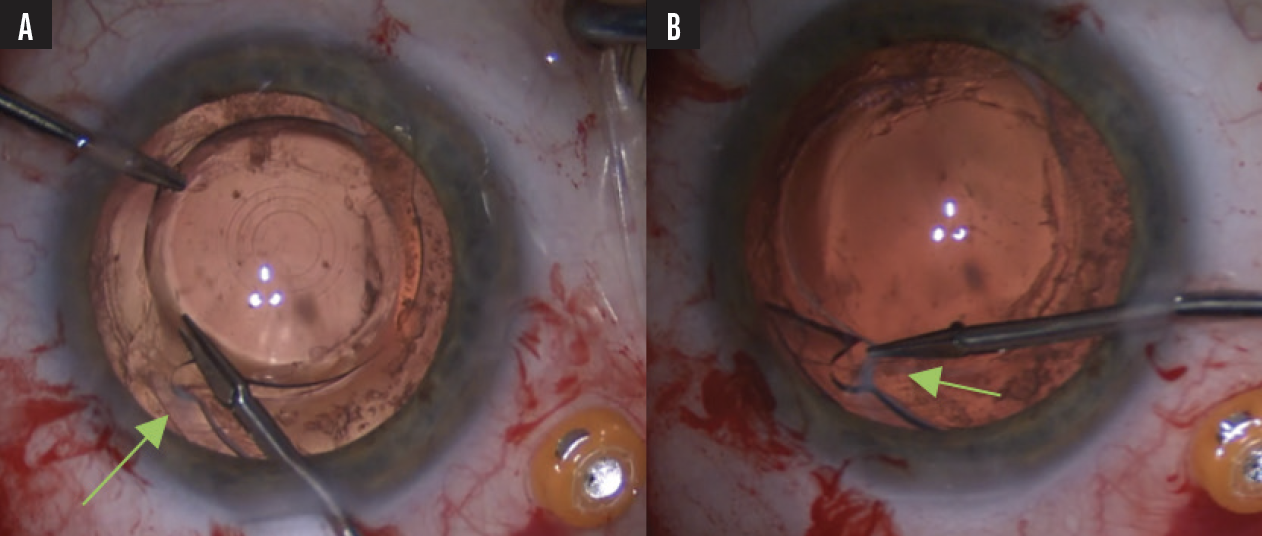
Figure 2. Fibrosis is visible at the haptic-optic junction (green arrow, A). To avoid the anterior capsule, 23-gauge microscissors are used to cut the fibrotic band (green arrow, B).
enVista platform (Bausch + Lomb). Removal of the enVista MX60E or MX60ET is similar fashion to that of other one-piece acrylic IOLs. Extensive fibrosis can occur at the optic-haptic–junction islets, making removal difficult in select cases.
ONE-PIECE HYDROPHILIC ACRYLIC
Some hydrophilic IOLs are associated with more anterior capsular fibrosis, but they are typically easier to remove that hydrophobic IOLs.
HD Oval Softec platform (Lenstec). This oval IOL has a larger diameter and is thicker in the center than other IOLs. An IOL cutter with serration or trisection as opposed to a bisection technique with 19-gauge microsurgical scissors may be required (Figure 3).
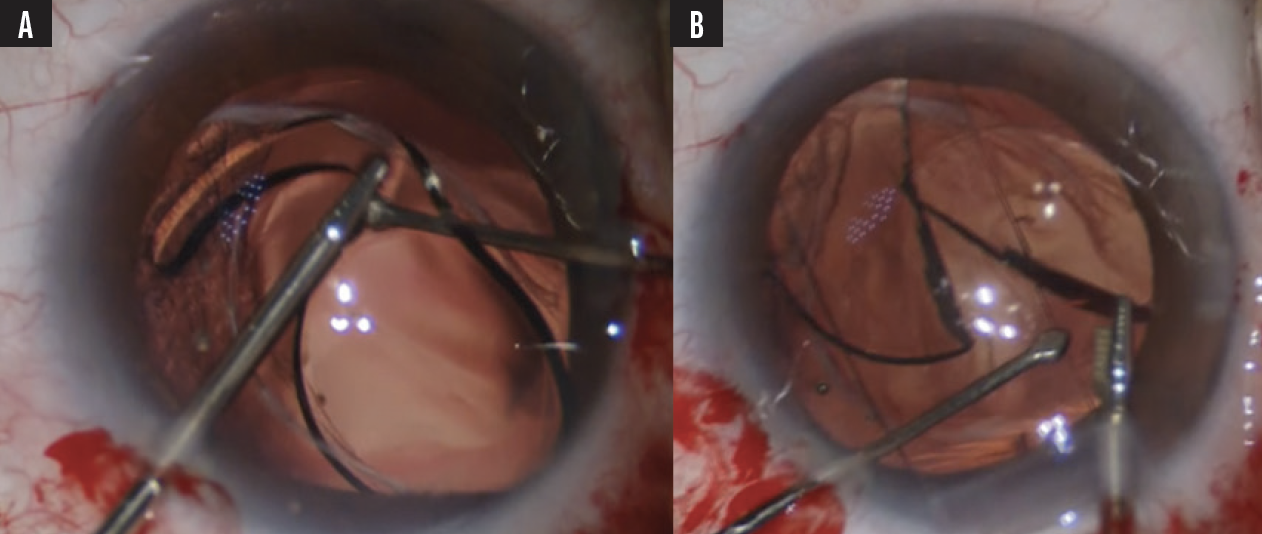
Figure 3. An HD Oval Softec IOL is rotated (A) and cut (B) before removal.
AO60 platform (Bausch + Lomb). This IOL has been associated with a higher incidence capsular phimosis and IOL opacification in the setting of prolonged exposure to air or gas. Fortunately, the haptics are generally removed easily. The IOL can be bisected with ease due to the hydrophilic material.
SILICONE IOLS
Generally, removal of a silicone IOL requires a firm grip on the optic with forceps and the use of heavier scissors to bisect the optic. Specific techniques are recommended depending on the type of silicone or UV treatment in the case of a Light Adjustable Lens (LAL; RxSight).
Crystalens (Bausch + Lomb). The Crystalens is a one-piece silicone IOL with broad flanged and polyimide haptics. The polyimide haptics tend to fibrose firmly at the capsular equator, making complete removal challenging. Remove cortical material carefully, polish the capsule, and create a large capsulotomy to avoid asymmetric fibrosis and Z syndrome with this IOL. If Z syndrome occurs and is not amendable to treatment with an Nd:YAG laser, remove and/or reposition the IOL. If the small optic diameter (5–5.5 mm) causes dysphotopsias, removal may be necessary.
Carefully viscodissect and prolapse the optic anteriorly during IOL removal. The haptics should be amputated at the haptic-optic–junction flange before the optic is removed. If the IOL is explanted in the early postoperative period, the polyimide haptics can sometimes be viscodissected out of the capsular bag. Otherwise, they can be amputated and left in the capsule. If the capsule fibroses asymmetrically due to phimosis and zonulopathy, the haptics may migrate centrally over time (Figure 4). When removing the silicone optic through a clear corneal incision, be prepared for the optic to be thick and slippery. Hold the IOL with a firm and paracentral grip with 23-gauge serrated forceps or Greishaber end-graspers. IOL bisection can be completed with 19-gauge scissors and a firm grip on the IOL with 23-gauge serrated forceps, but the best option is often to use heavier serrated scissors such as 18-gauge Snyder-Osher microscissors, MacKool IOL cutters, or Osher IOL cutters. The serrations on the blades of these scissors hold and cut the IOL simultaneously, providing extra control. Alternatively, the entire optic can be removed in one piece from a 5-mm frown scleral tunnel.

Figure 4. The IOL optic is prolapsed anteriorly (A). The haptics are amputated at the haptic-optic–junction flange (B, C). The polyimide haptics are viscodissected out of the bag (D). The optic is cut (E).
LAL. It may be necessary to remove the LAL in the untreated state if the haptic configuration is damaged during insertion. The ideal approach here is to bring the IOL into the anterior chamber. Fixate the IOL with serrated forceps or a 23-gauge Greishaber end-graspers and bisect the optic with serrated scissors. When removal occurs after UV treatment, the LAL can become extremely brittle and fall apart into small pieces, particularly in the area where the IOL is grasped (Figure 5A and 5B). A Sinskey or Kuglan hook can be used to provide countertraction at the edge of the lens to avoid grasping the IOL entirely. The optic of the IOL can be bisected in one or two movements with serrated 18-gauge Snyder-Osher scissors (video demonstration). I recommend enlarging the corneal incision to 3.2 to 3.5 mm to remove the bisected optic (Figure 5C and 5D; video demonstration) as the LAL optic is very thick.
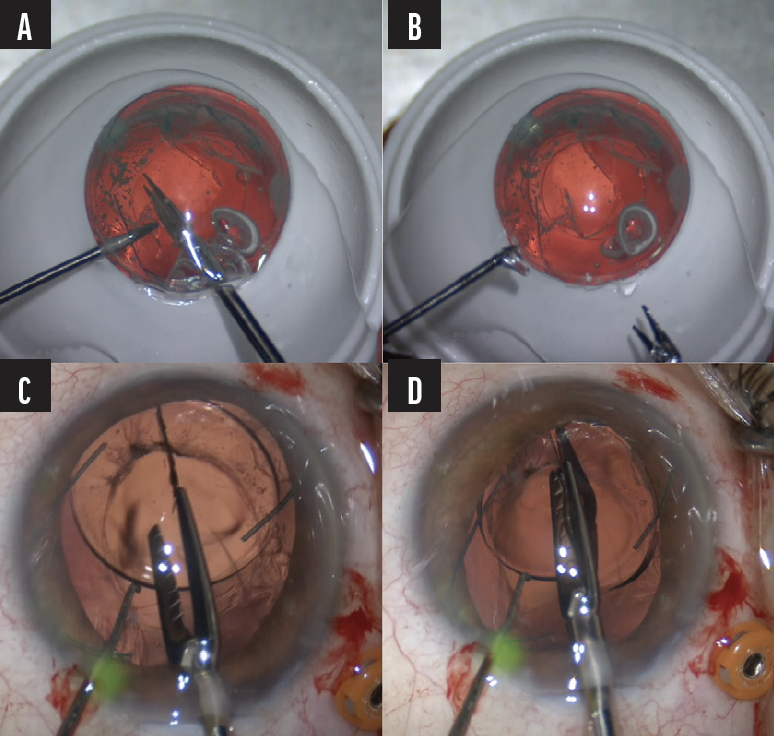
Figure 5. As the LAL is grasped, it falls apart into small pieces (A and B). The optic is bisected (C and D).
PMMA
PMMA material cannot be cut with intraocular scissors. IOLs of this type should be removed through a 6- to 7-mm scleral tunnel (Figure 6) depending on the optic size.
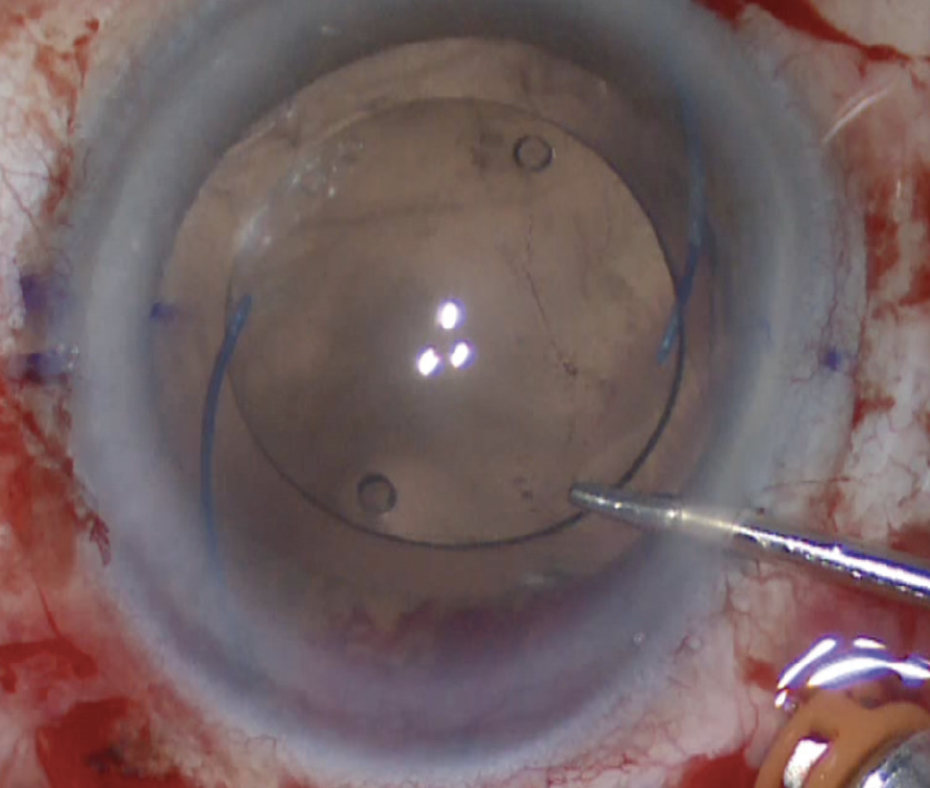
Figure 6. A PMMA IOL with C-loop haptics and a 7-mm optic.
Figures 1-6 courtesy of Nicole R. Fram, MD
1. Pandit RT, Devgan U, Chapman JM Jr. Twist and out intraocular lens removal. J Cataract Refract Surg. 2020;46(8):1072-1074.
2. Duncan NB, Micheletti MJ. Modified adaptation of the twist-and-out technique for intraocular lens exchange. J Cataract Refract Surg. 2022;48(12):1469-1471.
Strategies for Common IOL Configurations
Jonathan B. Rubenstein, MD

The technique for IOL removal depends upon myriad factors, including the location and design of the IOL and its material. Common configurations include one-piece PMMA, one-piece hydrophobic and hydrophilic acrylic, three-piece hydrophobic acrylic, one-piece collamer (STAAR Surgical), one-piece poly(ethylene glycol)/hydroxyethylmethacrylate/styrene copolymer, one-piece silicone, and three-piece silicone.
Regardless of the implications of IOL material and design, the general considerations for removal include freeing the IOL from anatomic attachments or adhesions (Figure 7), delivering it into the anterior chamber, and removing it from the anterior chamber through a corneal incision (Figure 8).
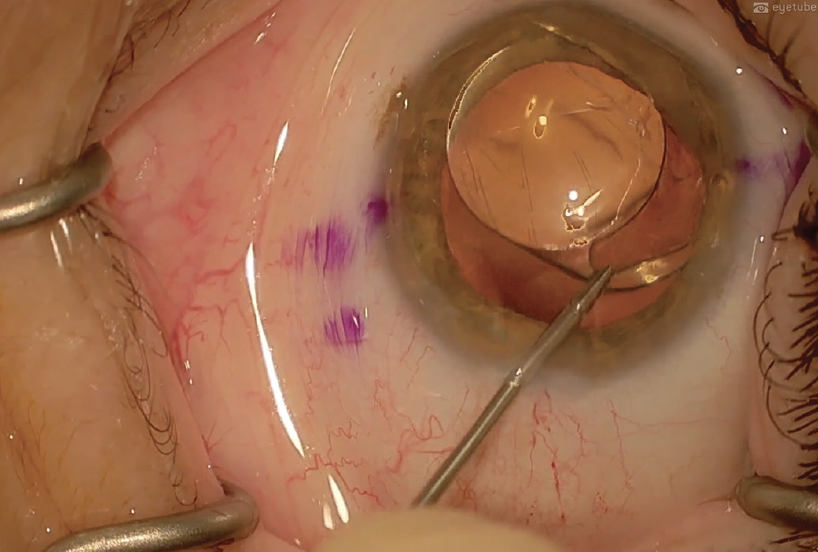
Figure 7. The haptics are freed from anatomic attachments and adhesions.
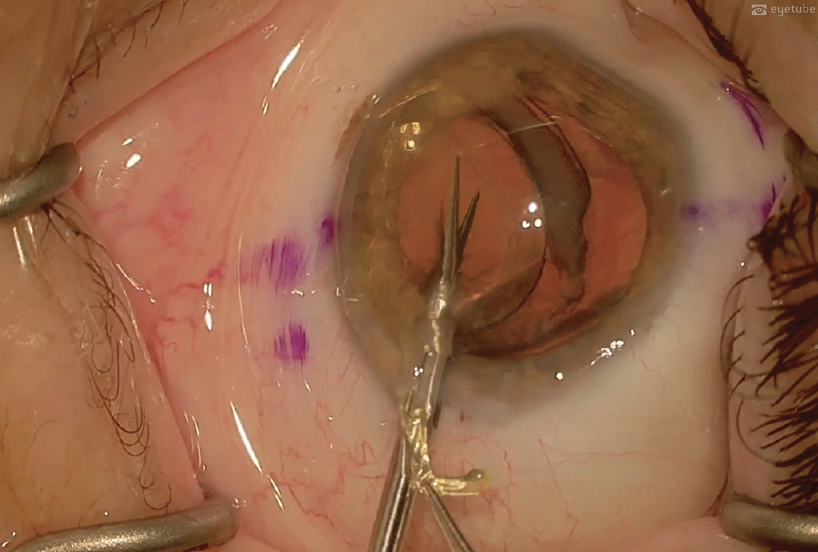
Figure 8. The IOL is explanted.
Figures 7 and 8 courtesy of Jonathan B. Rubenstein, MD
TECHNIQUE TWEAKS
My personal technique for removal varies as follows according to lens type. Watch two related videos below.
PMMA IOLs. Modern PMMA anterior chamber IOLs are flexible. They are typically designed with either three- or four-point fixation. IOLs made of PMMA require the wound to be enlarged to 6.5 to 7 mm because the optic cannot be cut before removal.
PMMA IOLs should be removed when they induce iritis, glaucoma, or corneal edema. Care must be taken to free the IOL haptics from anterior synechiae and adhesions to the peripheral iris or the angle. Anterior synechiae can be broken with a cyclodialysis spatula and careful viscodissection. Iris damage and bleeding during the dissection should be avoided.
Occasionally, the haptics of an anterior chamber PMMA IOL must be cut to facilitate IOL removal and avoid bleeding. The haptics can then be removed separately from the optic by snaking them out through the peripheral synechiae.
One-piece PMMA posterior chamber IOLs must also be freed from synechiae and suture attachments before dialing them into the anterior chamber.
Three-piece acrylic IOLs. The haptic materials of these IOLs have varying degrees of flexibility and memory. Understanding the lens haptic material is important before removal is attempted.
It is often easier to remove a three-piece lens than a one-piece lens because the haptics are thinner, allowing them to slide out of their capsular attachments more easily. After the haptics are free, the IOL is dialed into the anterior chamber with a lens hook and cyclodialysis spatula. Micrograsping forceps can also be useful. An adequate amount of an OVD should be present in the anterior chamber. A dispersive OVD helps protect the corneal endothelium, and a cohesive OVD helps maintain space and keeps the anterior chamber deep during IOL manipulations.
A 2.4- to 3-mm corneal wound is required for removal of a three-piece acrylic IOL. First, the lead haptic is delivered from the corneal wound. The IOL is then grasped with forceps, the optic is cut in the anterior chamber, and the lens is removed in two or three pieces. All IOL material, the haptics, and the optic must be removed completely.
One-piece acrylic IOLs. The status of the capsule and zonules determines whether an attempt to save the capsular bag for IOL replacement is made. One-piece acrylic IOLs can be located completely in, partially in, or outside the capsular bag. These IOLs require dissection from their capsular attachments before removal.
To remove an IOL from the bag, the anterior capsule must be dissected away from the anterior surface of the IOL with either a dull 27-gauge bevel-up needle or a Palay spatula. Once an area of separation has been created between the lens and the anterior capsule, a cohesive OVD is injected into the capsular bag to separate the IOL from the remainder of the bag. The IOL is delivered out of the bag and into the anterior chamber with hooks, spatulas, and microforceps.
The IOL can be removed by completely or partially cutting, folding, or rolling it. Cutting the IOL is performed with IOL-cutting microscissors (eg, Chang microscissors) and a two-handed technique. For a complete IOL cut, the IOL is stabilized with microforceps, cut into two or three pieces, and removed through a 2.4- to 3-mm incision. For a partial cut technique, the IOL is cut two-thirds of the way across (ie, Pac-Man style) and then rotated out of the eye. To refold an IOL, a paracentesis incision is made 180º away from the corneal wound. A straight spatula is placed under the IOL, and the IOL is folded on top of the spatula with folding forceps. The IOL is then rotated 90º and removed from the eye.
To roll the IOL, it is grasped with and rolled over a Kelman-MacPherson forceps in a clockwise direction, as first described by Pandit and colleagues and modified by Duncan and Micheletti.1,2 A spatula is held over the IOL to prevent it from touching the cornea. With folded and rolled IOL techniques, the IOL is removed from the eye through a 2.4- to 3-mm corneal incision.
Silicone IOLs. Silicone is stiffer, more slippery, and less forgiving than acrylic. These IOLs cannot be refolded or rolled in the eye; they must be cut. I find it easiest to cut the IOL in half and remove each half. Alternatively, the IOL can be cut Pac-Man style if the wound is enlarged to 3 mm. Because silicone is slippery, a secure grasp of the lens with micrograsping serrated forceps is essential.
1. Pandit RT, Devgan U, Chapman JM Jr. Twist and out intraocular lens removal. J Cataract Refract Surg. 2020;46(8):1072-1074.
2. Duncan NB, Micheletti MJ. Modified adaptation of the twist-and-out technique for intraocular lens exchange. J Cataract Refract Surg. 2022;48(12):1469-1471.
Consider Exchanging the IOL in Five Scenarios
Shannon Wong, MD

I consider IOL exchange for five scenarios: a residual refractive error due to incorrect IOL power, the patient is dissatisfied with the visual quality provided by the first IOL, the patient wishes to upgrade from an older- to a newer-generation IOL (not encouraged), to treat negative dysphotopsias with reverse optic capture while preserving the refractive status of the eye, and after an Nd:YAG laser capsulotomy of a one-piece acrylic IOL. The last is my least favorite type of IOL exchange procedure to perform and unfortunately the one I probably perform most frequently.
When removing a posterior chamber IOL, regardless of its design or material, from inside the capsular bag, I use a similar technique and the following steps (watch the video demonstrations below):
- The anterior capsule is elevated from the anterior IOL surface with a Donnenfeld spatula (Figure 9);
- An OVD (Healon GV, Johnson & Johnson Vision) is injected to expand the capsular leaflets away from the IOL optic and haptics (Figure 10);
- The IOL is dialed into the anterior chamber with microinstrumentation (Figure 11);
- The IOL is grasped with microforceps and cut into pieces (Figure 12); and
- The pieces of the IOL are removed from the eye through a 2.8-mm incision (Figure 13).

Figure 9. The anterior capsule is elevated from the anterior IOL surface.
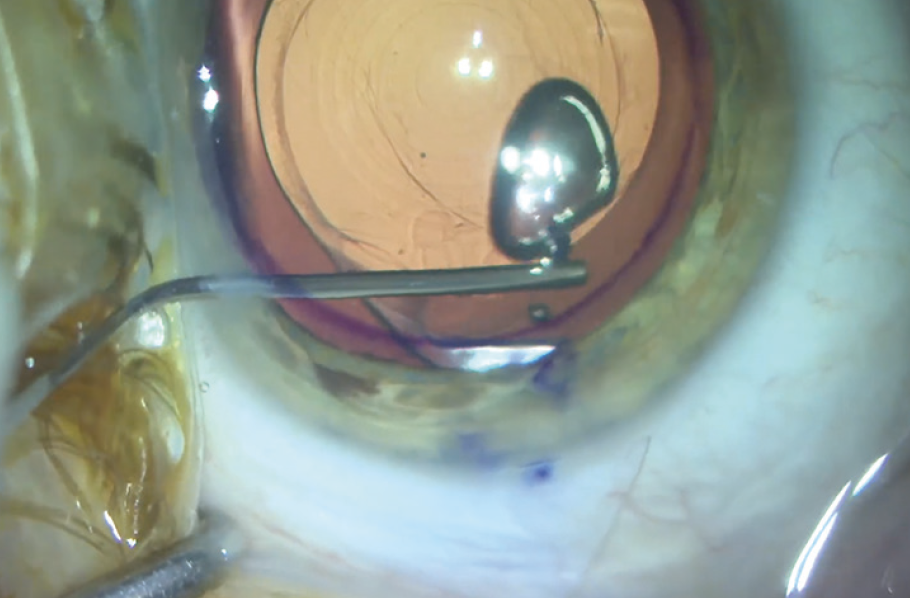
Figure 10. An OVD is injected to expand the capsular leaflets.
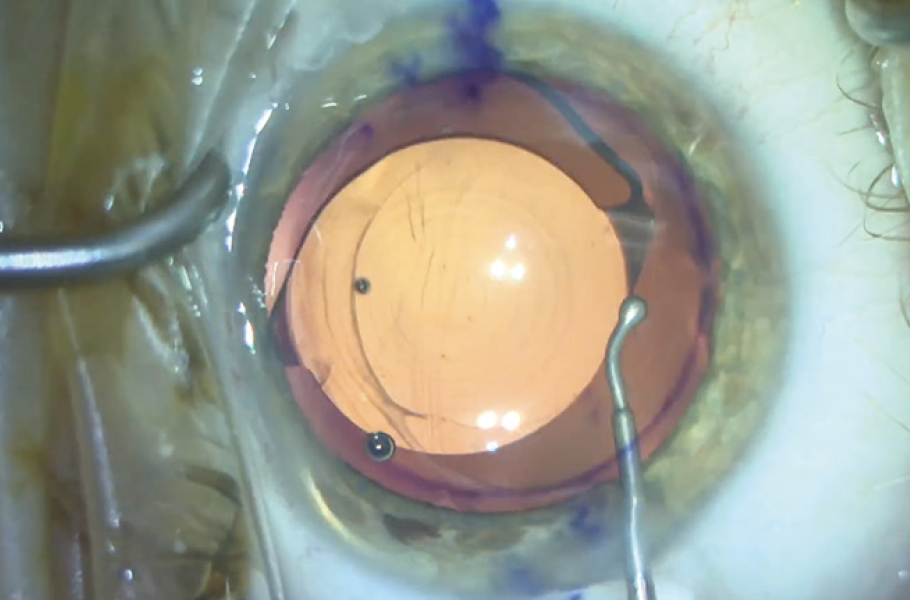
Figure 11. The IOL is dialed into the anterior chamber.
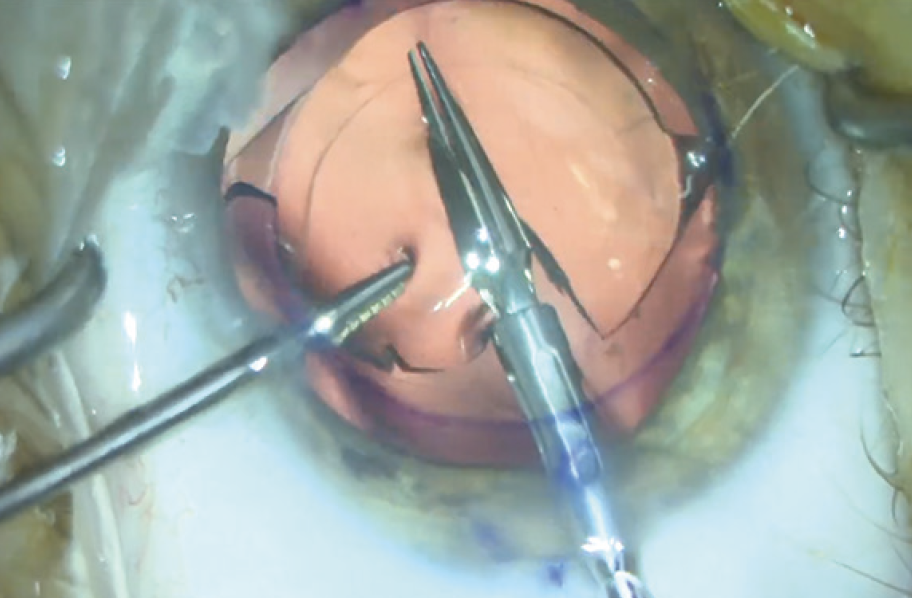
Figure 12. The IOL is cut into pieces.
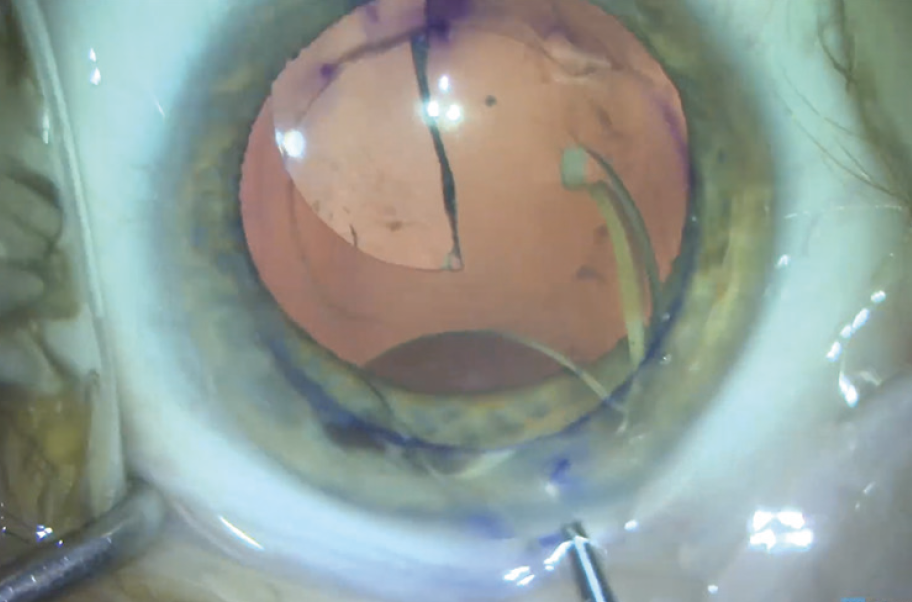
Figure 13. The IOL is removed from the eye.
Figures 9-13 courtesy of Shannon Wong, MD
To facilitate surgical planning and a successful outcome, the preoperative examination should be performed while the pupil is dilated, the dimensions and the condition of the capsular bag should be checked, and the capsular axis opening should be centered.

