

A Dozen Pearls
Zaina Al-Mohtaseb, MD

The double-needle, small-incision, sutureless, transconjunctival scleral fixation technique was first described by Yamane et al in 2017.1 It uses small-gauge sclerotomies and a small clear corneal incision. The Yamane technique is associated with a quick visual recovery and a low risk of postoperative hypotony. Neither capsular nor iris support is required, and suture-related complications are avoided.
It is important to note, however, that only short-term data on the safety and efficacy of this technique are available. Moreover, because this is a two-point fixation technique, there is a risk of IOL decentration and tilt, and great precision is required to decrease this risk (watch a related video below). Additionally, the learning curve is steep.
TWELVE TIPS
My contribution in this article contains 12 tips and tricks to help with mastering this technique.
No. 1: Use the TSK thin-walled special 30-gauge needles. Make sure to loosely attach the needles to a non–luer-locking tuberculin syringe filled with balanced salt solution. This fill prevents bubbles from entering at the tip of the needle, which can make threading the haptic difficult.
No. 2: Implant the most appropriate IOL. The CT Lucia 602 (Carl Zeiss Meditec) is the ideal three-piece lens to use for the Yamane technique because its PVDF haptics resist kinking and breakage.
No. 3: Keep an eye on the pressure. An anterior chamber maintainer or an infusion cannula is vital to maintaining IOP and ensuring that both sclerotomy passes are similar in length and location.
No.4: Check for adequate support. If iris support is inadequate and the IOL is in danger of being lost posteriorly during the procedure, a small amount of a miotic agent injected intracamerally will constrict the pupil slightly. This helps create a platform on which to rest the leading haptic. I like leaving the trailing haptic of the three-piece lens outside the wound.
No. 5: Prevent postoperative tilt and decentration of the IOL. The needles must be inserted exactly 180º apart and 2.5 mm posterior to the limbus unless the axial length of the eye is extremely short or long. Also, the sclerotomy tunnels must be equal in length.
No. 6: Be prepared for chemosis and subconjuctival hemorrhage. If chemosis or a subconjunctival hemorrhage develops, especially in combination cases, it is best to perform a limited peritomy to ensure that the sclerotomy passes are performed correctly.
No. 7: Stabilize the globe. A good tip is to place toothed forceps near the marked point of needle insertion during the scleral insertion.
No. 8: Thread the trailing haptic with care. The most technically difficult step of the Yamane technique is threading the trailing haptic into the needle. I recommend creating a paracentesis approximately 180º away from the sclerotomy to optimize the direction of the intraocular 25-gauge Grieshaber Maxgrip forceps (Alcon) so that the haptic can be grasped parallel to its span and more in line with the 30-gauge needle. Alternatively, the wound may be created slightly to the left of the 180º meridian.
No. 9: Look for proper centration of the IOL. Slowly remove both needles simultaneously and observe the optic’s centration. It is important to look for decentration and tilt before cauterizing the haptics.
No. 10: Recenter the IOL if necessary. If IOL centration is poor or the IOL is tilted and the needle insertions are not 180º apart or not located the same distance from the limbus, then one of the haptics must be reinserted into the eye and refixated with a new needle pass. If IOL centration is poor because the scleral tunnels differ in length, one or both haptics can be trimmed and then cauterized to improve centration.
No. 11: Avoid pupillary capture of the iris. Insert the needle 2.5 mm instead of 2 mm posterior to the limbus. Alternatively, a peripheral iridotomy may be performed.
No. 12: Target slight myopia. Choose a refractive target of -0.50 to -0.75 D to avoid a postoperative hyperopic surprise.2
1. Yamane S, Sato S, Maruyama-Inoue M, Kadonosono K. Flanged intrascleral intraocular lens fixation with double-needle technique. Ophthalmology. 2017;124(8):1136-1142.
2. McMillin J, Wang L, Wang MY, et al. Accuracy of intraocular lens calculation formulas for flanged intrascleral intraocular lens fixation with double-needle technique. J Cataract Refract Surg. Published online December 9, 2020. doi:10.1097/j.jcrs.0000000000000540
Major Difficulties and How to Address Them
Nicole R. Fram, MD

I have been using the Yamane technique since 2017, when Shin Yamane, MD, PhD, first published his results.1 Before that, I had been using various scleral and iris fixation techniques. These are the seven most important lessons I have learned over the past 3.5 years.
LESSONS LEARNED
No. 1: Perform an adequate vitrectomy. A vitrectomy is required before any scleral fixation technique is performed. At the outset of every case, I look for vitreous prolapse by injecting preservative-free triamcinolone acetonide to stain vitreous strands. I then inject an OVD and perform a pars plana–assisted anterior vitrectomy through preplaced 23- or 25-gauge trocars depending on the vitrectomy unit.
No. 2: Know where to make the main incision. The Baylor group taught me to make my main 3-mm clear corneal temporal incision a little bit supratemporal to 180º for the right eye (infratemporal for the left eye) so that the proximal haptic docks more easily. Additionally, leaving the trailing (proximal) haptic outside of the incision before the scleral tunnel needle pass can assist with a parallel docking.
No. 3: Avoid tilt. The IOL can tilt if there is an asymmetry in needle entry points or tunnel length. The entry points should be exactly 180º apart and at least 2 mm back from the limbus depending on the white-to-white measurement. Each scleral tunnel has to be symmetrical and measure 1.5 to 2 mm in length. This can be a challenge if conjunctival chalasis or chemosis is present. If this is the case, the conjunctiva must be taken down to confirm symmetry of entry and tunnel length. Angulation is another major consideration: The needles should enter at a 20º angle to the limbus in order to approximate the natural curvature of the haptics and avoid tilt, as Dr. Yamane described in his original technique.1
No. 4: Avoid pupillary capture of the optic. The reason for pupillary capture involves inherent iridodonesis in vitrectomized eyes and asymmetric entry of the needles into the eye. A laser peripheral iridotomy may be used to treat uveitis-glaucoma-hyphema syndrome in eyes with reverse pupillary block that receive sulcus-fixated IOLs.2 This concept is applicable to the Yamane technique provided that IOL tilt is not severe.
I typically perform peripheral iridotomies on all patients with scleral fixation by using the vitrector on I/A settings with a vacuum level of 700 mm Hg and a cut rate of 100 cuts per minute. If there is excessive iridodonesis, I perform two surgical peripheral iridotomies 90º apart. If the eye has pupillary capture, I use ultrasound biomicroscopy (Figures 1 and 2) to distinguish between excessive iridodonesis without adequate peripheral iridotomies to equilibrate the anterior and posterior chambers (Figure 1) and significant IOL tilt (Figure 2). This distinction is important because leaving an excessively tilted IOL in these eyes can cause chronic pigment dispersion, iris transillumination defects, and potentially chronic cystoid macular edema or ocular inflammation.
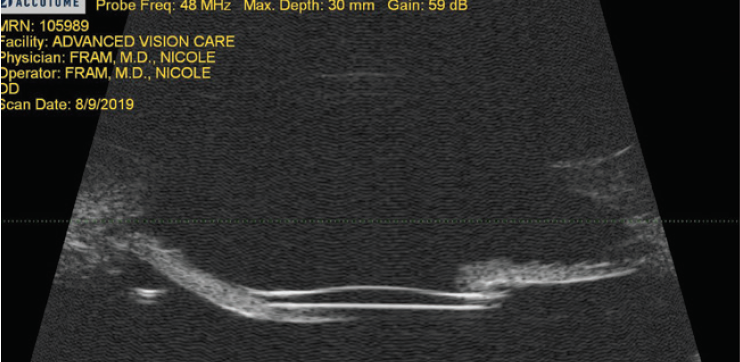
Figure 1. Ultrasound biomicroscopy revealing excellent IOL placement without tilt and a draping of the iris over the edge of the IOL. The treatment was two surgical peripheral iridotomies.
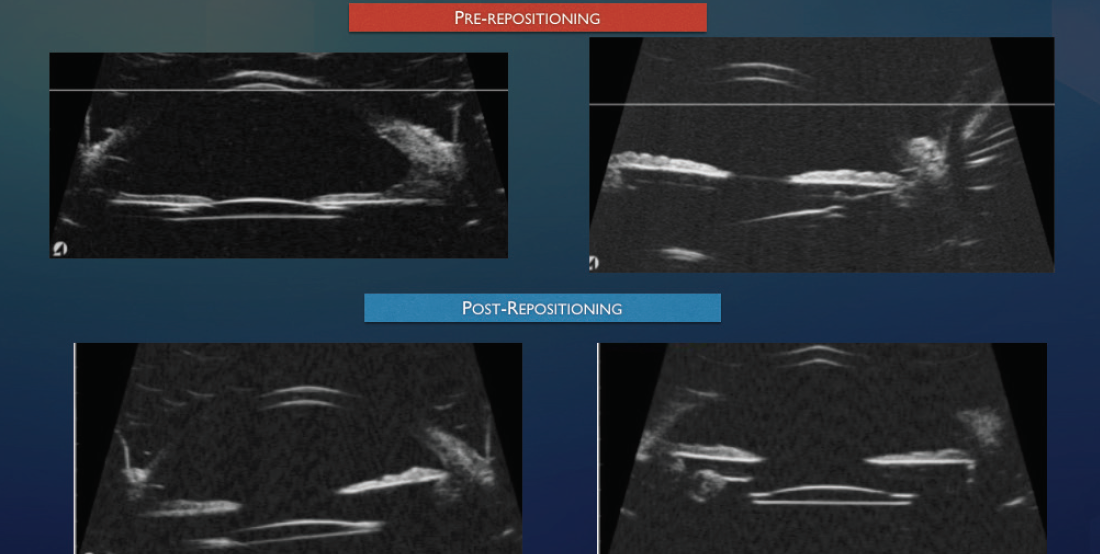
Figure 2. Ultrasound biomicroscopy of a tilted IOL after intrascleral haptic fixation (Yamane technique) causing significant tilt, uveitis-glaucoma-hyphema syndrome, and iris chafing with transillumination defects.
Figures 1 and 2 courtesy of Nicole R. Fram, MD
For example, in the eyes I have treated for pupillary capture and tilt, the needle entry into the eye from the limbus was approximately 1.8 mm on one side and 1.5 mm from the limbus on the captured side. The more anterior haptic entry was retrieved, cut on a bevel, tested outside the eye for ability to dock into a thin-walled 30-gauge needle, and then brought into the eye for redocking more posteriorly. This resolved the issue.
No. 5: Bury the terminal bulb. An unburied flange can cause conjunctival erosion and create a nidus for infection, scleritis, and endophthalmitis. The flanges on various types of haptics can differ; PVDF haptics create a mushroom bulb, and PMMA haptics create a triangular flange.
At the end of every case, I make a little buttonhole on the conjunctiva or Tenon capsule, and I look at the terminal haptic bulb. I then grab the sclera and push the terminal bulb into the scleral tunnel with one end of a straight forceps. I do not want the terminal bulb to sit under the conjunctiva. In some of my early cases, I thought I had pushed the bulb all the way in when it was actually wrapped around Tenon capsule and pulled out as it healed. The terminal bulb of the haptic was slightly extruded under the conjunctiva, which is not ideal in eyes with thin conjunctiva.
No. 6: Do a final check. It is not sufficient to insert the lens optic and hope for the best. Centration of the IOL must be verified at the end of the case, and the only way to do this is to use iris hooks and look.
No. 7: Choose the right tools. The CT Lucia 602 IOL is my preferred IOL because its PVDF haptics facilitate burial of the bulb. Unfortunately, availability of this IOL has been limited. My preferred alternative is the Tecnis IOL (model ZA9003, Johnson & Johnson Vision). Its PMMA haptics may bend, so it is important to understand the importance of angles and how to dock the needles.
The proper needles for the Yamane technique have thin walls. The needles included in the Scleral IOL Fixation Solutions Pack (MicroSurgical Technology) are excellent choices for this technique as are the TSK thin-walled 30-gauge needles.
1. Yamane S, Sato S, Maruyama-Inoue M, Kadonosono K. Flanged intrascleral intraocular lens fixation with double-needle technique. Ophthalmology. 2017;124(8):1136-1142.
2. Singh H, Modabber M, Safran SG, Ahmed II. Laser iridotomy to treat uveitis-glaucoma-hyphema syndrome secondary to reverse pupillary block in sulcus-placed intraocular lenses: case series. J Cataract Refract Surg. 2015;41(10):2215-2223.
My Pearls and Modifications
D. Brian Kim, MD

It’s been 4 years since I shared my modifications to and pearls for the Yamane technique in CRST.1 Here I share four key principles that have helped me to improve the consistency and safety of the technique.
KEY PRINCIPLES
No. 1: Proper needle placement is crucial. I cannot emphasize enough the importance of proper placement of the scleral needle. Successfully cannulating both needles and externalizing both haptics will not matter if the scleral needle tracts are too short or misaligned. This is a major failure because of the potential for IOL decentration or IOL-uveal contact.
No. 2: Conjunctival marks should reflect correct placement of the scleral needle. Instruments have been developed to bring more consistency to the Yamane technique. The challenge, in my opinion, is that the white-to-white measurement differs for every eye. I believe that conjunctival marking plays an important role, but there is a problem: Because the conjunctiva is thin and moveable, the marks may not reflect the intended scleral needle placement if this tissue is stretched and displaced. The key, therefore, is to immobilize the conjunctiva in a neutral position. For me, this is 2.5 mm posterior to the limbus and 2.0 mm adjacent to this mark. Placing the needle 2.5 mm posterior to the limbus reduces the risk for IOL-uveal contact. This requires a -1.00 D IOL target for a plano refractive result.
I use 0.12 forceps to hold the eye so that the conjunctival marks remain stationary to reflect the correct scleral needle placement (Figure 3). To do this, the globe must be firm. A soft eye can collapse when the needle is pushed through the sclera, and the chance for incorrect needle placement is higher. I switched to a 20-gauge Lewicky anterior chamber maintainer to help pressurize the eye, but posterior infusion through a pars plana trocar is another strategy used by some surgeons.
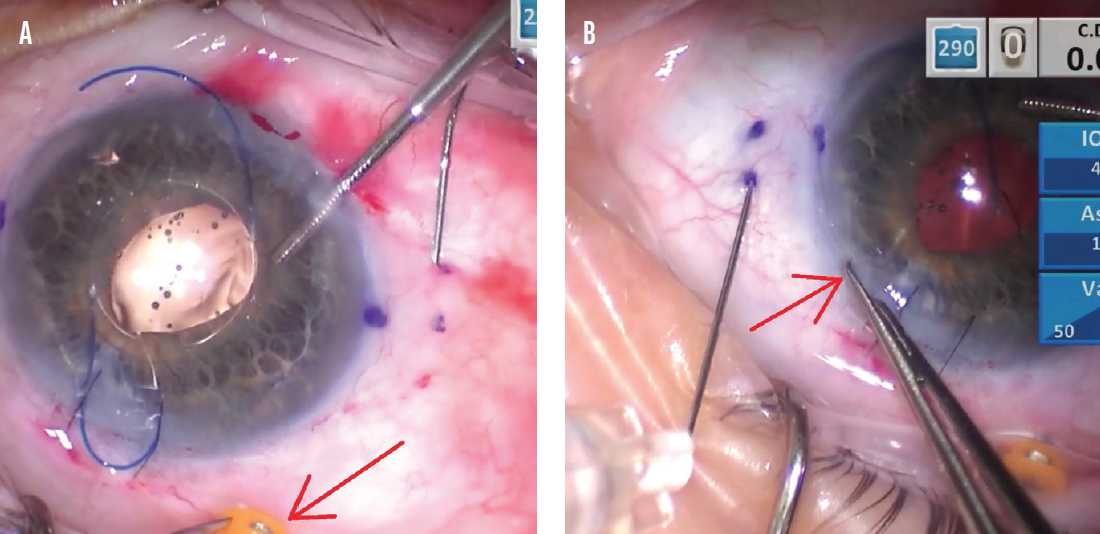
Figure 3. The trocar is held with 0.12 forceps to stabilize the conjunctiva in a neutral position for proper placement of the right-side scleral needle (A). The incision is held with 0.12 forceps for the left-side needle in a similar fashion (B).
No. 3: Try my trailing haptic first modification to bypass the biggest technical challenge. Dr. Yamane makes his technique look so easy. As originally described,2 the trailing haptic is cannulated only after the leading haptic has been cannulated with the left-side needle. As a result, the leading haptic is tethered to the left-side needle, which is also anchored to the scleral wall. When cannulation of the right-side needle with the trailing haptic is attempted, there is a push-pull effect from the complex that comprises the leading haptic and left-side needle. This rightward force resists and interferes with the surgeon’s ability to pull the trailing haptic toward the left when attempting to align the haptic to cannulate the right-side needle (Figure 4).
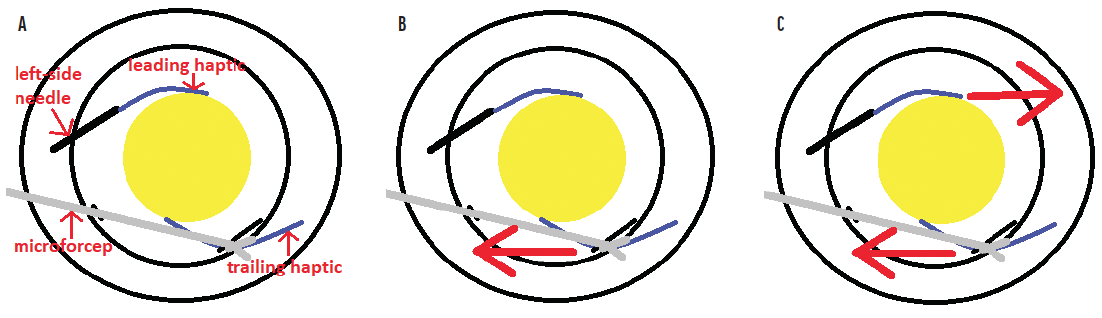
Figure 4. The complex consisting of the left-side needle and leading haptic. Microforceps are used to grasp the trailing haptic (A). The trailing haptic is pulled toward the left (B). Because the complex consisting of the left-side needle and leading haptic is fixed to the sclera, it resists this pulling with an opposing force toward the right (C).
Increasing the challenge is that the best-suited IOLs—those with sturdy PVDF haptics—are not readily available in the United States. The only one available here is the CT Lucia 602, which has been in short supply. Surgeons learning the Yamane technique, therefore, are often left to experiment with standard three-piece IOLs that have PMMA haptics, which can break off or get kinked when cannulation of the needle is attempted. The damaged IOL must be explanted, and the risk of complications increases.
I developed a trailing haptic–first modification as a way to bypass this potential hurdle.3 The technique involves externalizing the leading haptic through a contralateral limbal incision, which I find makes accessing the trailing haptic much easier (Figure 5). After the trailing haptic is cannulated through the right-side needle, the leading haptic is pulled in through the limbal incision with microforceps, placed in the angle, and cannulated with the left-side needle in a standard fashion. Because there is less manipulation of and stress on the PMMA haptics, there is a significantly lower risk of damaging or breaking them. With many surgeons having trouble obtaining the CT Lucia 602 IOL, adopting a technique such as this is important. (To watch a demonstration of the technique using a Sensar IOL [model AR40, Johnson & Johnson Vision] with delicate PMMA haptics, watch the video below.)
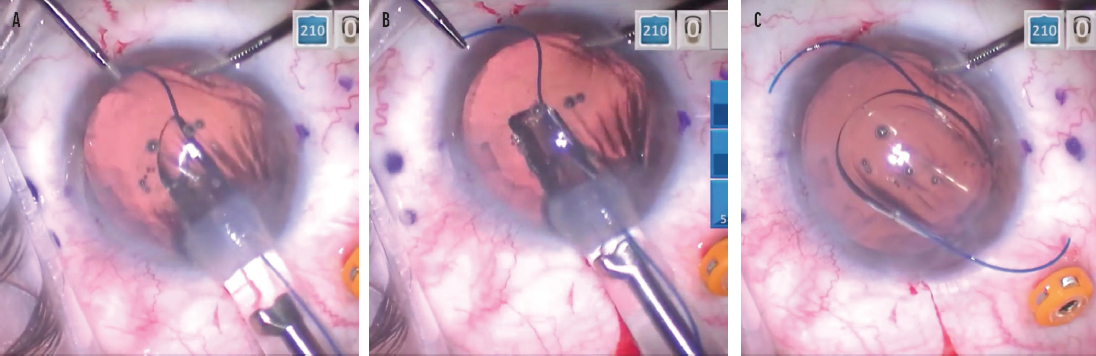
Figure 5. As the leading haptic is delivered into the anterior chamber, microforceps are used to grasp the leading haptic through a contralateral limbal incision (A). The leading haptic is pulled out of the incision with microforceps (B). The optic is delivered in the anterior chamber, and the trailing haptic is delivered outside of the eye and positioned so it points to the right (C).
If the CT Lucia 602 is unavailable, I recommend a Tecnis or a Sensar IOL. The AcrySof IOL (model MA60AC, Alcon) is poorly suited for the Yamane technique because of the curve in the haptic tips.
No. 4: Straighten the haptic. Because the needle is metal and cannot be bent, the haptic must be straightened in order to pass through the straight needle. My technique is to dock the haptic on the bevel of the needle, which functions as a platform and guide to allow the haptic to be straightened and aligned with the needle. Once the haptic is straight, it slides more easily into the needle (Figure 6). If a PMMA haptic is forced into the needle when it is not straight, the haptic is easily damaged and the IOL is potentially rendered unusable, requiring explantation.
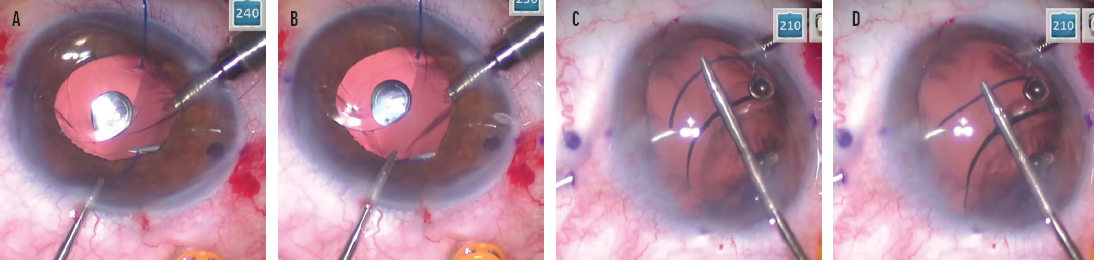
Figure 6. The trailing haptic is docked on the bevel of the right-side needle. Note the ease of access using the trailing haptic–first modification (A). Docking the trailing haptic within the bevel allows it to be straightened and then advanced into the needle (B). The leading haptic is docked on the bevel of the left-side needle (C). Docking the leading haptic within the bevel allows it to be straightened and then advanced into the needle (D).
Figures 3–6 courtesy of D. Brian Kim, MD
CONCLUSION
There are many ways to execute the Yamane technique. The pointers shared by all three panelists can help readers to achieve successful surgical outcomes.
1. Kim DB. The next big thing in scleral haptic fixation. Cataract & Refractive Surgery Today. October 2017. Accessed March 16, 2021. https://crstoday.com/articles/2017-oct/the-next-big-thing-in-scleral-haptic-fixation
2. Yamane S, Sato S, Maruyama-Inoue M, Kadonosono K. Flanged intrascleral intraocular lens fixation with double-needle technique. Ophthalmology. 2017;124(8):1136-1142.
3. Kim DB. Trailing-haptic-first modification of double-needle intrascleral haptic fixation technique. J Cataract Refract Surg. 2018;44(4):424-428.