


The Yamane technique: Step by step.
By Brandon D. Ayres, MD
Pseudoexfoliation syndrome is one of the most common reasons for lens dislocation during cataract surgery. For such cases, and for eyes in which capsular support is absent, multiple IOL fixation techniques have been used over the years. In my practice, we have transitioned from suture techniques to an elegant sutureless haptic fixation technique, the Yamane technique.
This has been our primary technique for scleral fixation of an IOL for the past 2 years. The procedure has its complexities and involves performing multiple components in a specific order. Now, the technique can be simplified using the Scleral IOL Fixation Solutions Pack (SFP; MicroSurgical Technology), which provides all the tools required to use the Yamane approach for scleral fixation of IOLs.
THE CONCEPT
The idea behind the Yamane technique is to externalize the haptics of a three-piece IOL using thin-walled 30- or 27-gauge needles through two transconjunctival sclerotomies. The haptics of the IOL are carefully laced into the lumen of the needles using intraocular forceps. Then the needles are used to externalize the haptics on the conjunctival surface. Next, low-temperature cautery is used to make a flange at the end of the haptics. This flange or bulb prevents the haptics from prolapsing back into the posterior chamber, and the three-piece IOL is thereby fixated efficiently in the posterior segment in the absence of capsular support.
STEP BY STEP
The Yamane technique involves the following steps:
Step No. 1
Carefully measure for the exact placement of the haptics at the beginning of the case (Figure 1). This is critical to minimize the risk of decentration or tilt of the IOL.
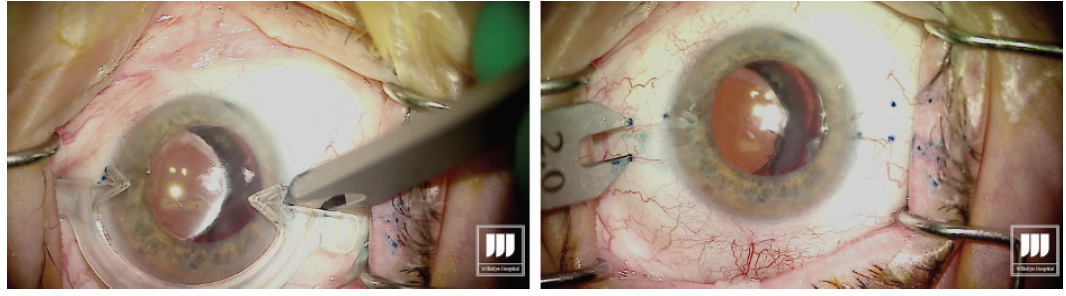
Figure 1. Measuring and marking of the needle insertion sites.
Figures 1–6 courtesy of Brandon D. Ayres, MD
- Hint: Before inserting the IOL into the anterior chamber it is important to ensure that no vitreous is present.
Step No. 2
Once the measuring is completed, place the three-piece IOL in the anterior chamber. My preferred IOL for haptic fixation is the CT Lucia 602 (Carl Zeiss Meditec) due to the durability of its PVDF haptics. Typically at this point, I place the leading haptic in the nasal anterior chamber and leave the trailing haptic hanging out through the main incision.
Step No. 3
Maintain the anterior chamber. I like to use an anterior chamber maintainer in the eye in order to prevent hypotony.
Step No. 4
Make the transconjunctival sclerotomy with the thin-walled 30-gauge needle.
Step No. 5
Make the first sclerotomy 2.5 mm posterior to the limbus. The intrascleral length of the tunnel is about 2 to 2.5 mm as well.
Step No. 6
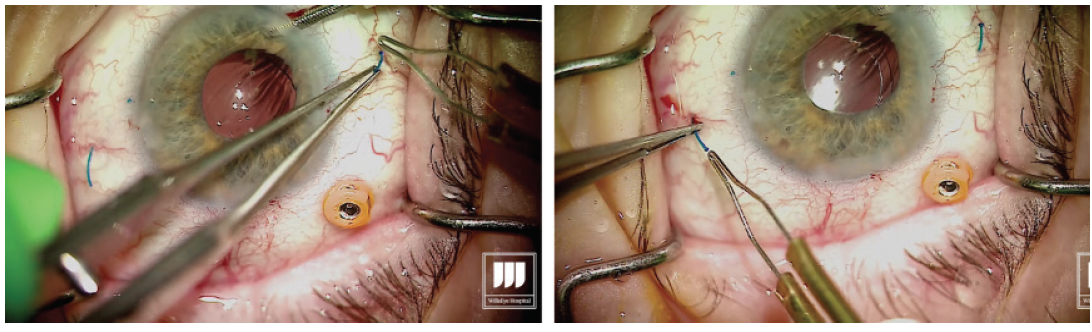
Grasp the leading haptic using intraocular 25-gauge microforceps and carefully lace it into the lumen of the needle (Figure 2).
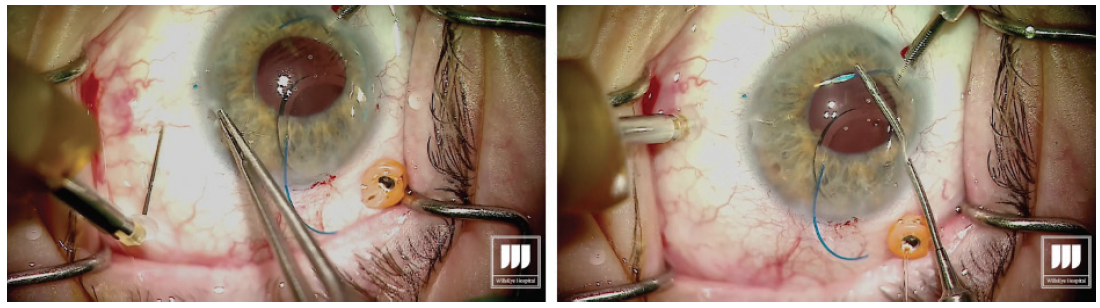
Figure 2. After the first sclerotomy is created, the leading haptic is placed into the lumen of the needle.
Step No. 7
Once the first haptic is securely laced into the lumen of the needle, the hub is released from the holding forceps, allowing the IOL to move into the eye. Figure 3. The leading haptic is left fixed inside the needle to avoid potential difficulties with externalization of the trailing haptic. Step No. 8
Introduce the trailing haptic into the anterior chamber, then grasp the second needle to perform the transconjunctival sclerotomy about 2.5 mm posterior to the limbus with core length of about 2 mm. This second sclerotomy is made exactly 180° across from the first one. Step No. 9
Once the second sclerotomy is made, visualize the lumen of the needle through the cornea and pupillary space. I always aim to achieve a similar angle of the haptic and the needle for even alignment of the IOL. Using the microforceps, grasp the second haptic and place it in the lumen of the needle. Step No. 10
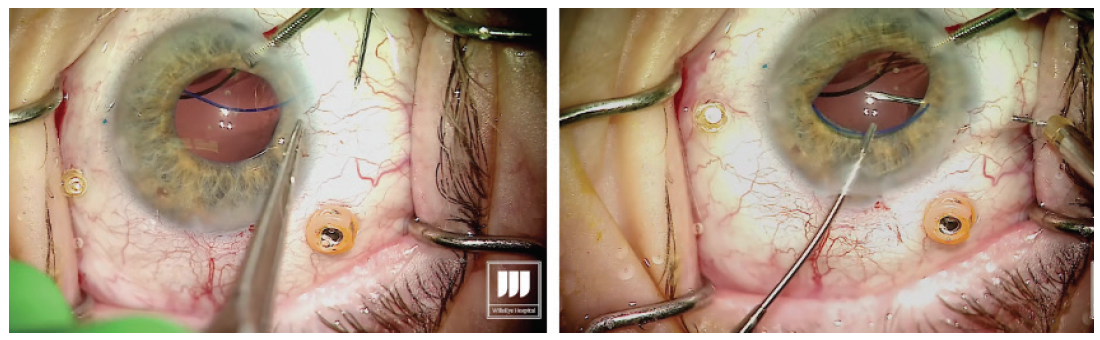
With the second haptic now introduced into the lumen of the needle, externalize the haptic by removing the needle through the transconjunctival sclerotomy, then carefully grasp the haptic (Figure 4). Figure 4. Externalization of the trailing haptic. Step No. 11
With low-temperature cautery, melt about 1 to 2 mm of the terminal end of the haptic to create a flange or bulb that will prevent the haptic from prolapsing through the scleral incision (Figure 5). Figure 5. Cauterization of the externalized haptics. Step No. 12
Go to the other side of the eye, 180° across, where the needle is still penetrating the sclera holding the leading haptic of the IOL. Externalize the needle and grasp the haptic on the conjunctival surface. Again, melt the end using low-temperature cautery. Step No. 13
Prolapse the haptic through the conjunctiva and force it into the scleral channel. Step No. 14
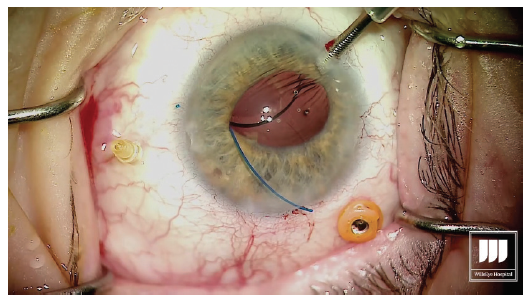
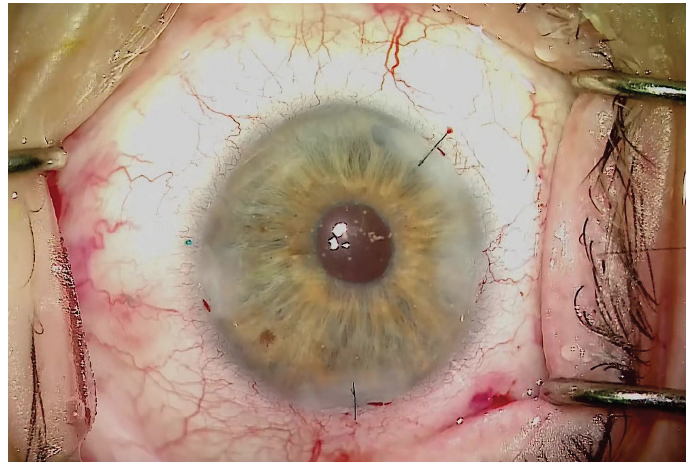
The result should be a well-centered three-piece IOL suspended in the posterior segment with no sutures (Figure 6). Figure 6. A well-centered three-piece IOL placed using
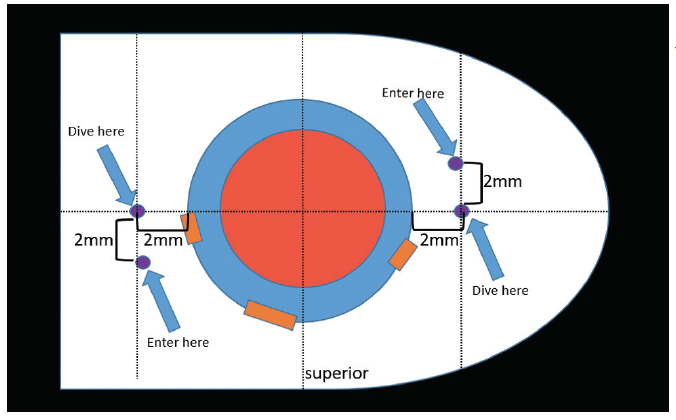
the Yamane technique. The learning curve for this technique to place an IOL without capsular support is steep, but once it is mastered it should take only 15 to 20 minutes to complete. In my experience, the greatest challenges with this technique are measuring for placement of the needle insertion sites and lacing the trailing haptic into the lumen of the needle. The most difficult intraocular maneuver is probably lacing the trailing haptic. This is very challenging, but with the right approach and instrumentation, unnecessary complications can be avoided. By Zaina Al-Mohtaseb, MD The small-incision, sutureless, transconjunctival scleral fixation technique first described by Yamane et al1 for use in eyes with absence of capsular support involves the creation of small-gauge sclerotomies and a small clear corneal incision, resulting in a fast visual recovery and a low risk of postoperative hypotony. A few pearls can help surgeons overcome the challenges of performing this technique. Technically any three-piece IOL can be used in the Yamane technique; however, we have found that IOLs with PVDF haptics are durable and resistant to kinking and breaking. For this reason, the CT Lucia 602 is our preferred IOL for performing this procedure. Loosely attach each 30-gauge needle and do not use a luer-lock syringe. This will avoid the possibility of experiencing difficulty detaching the syringe. Fill syringes with a small amount of balanced saline solution and make sure to irrigate the needle before the scleral pass. This can help to avoid air bubbles that can interfere with the view for needle insertion during haptic fixation. Use an anterior chamber maintainer to ensure a firm eye during the creation of the sclerotomies. If the IOL is poorly centered or tilted, the three most common causes are: If the needle insertion points are different distances from the limbus or are not 180° apart, one of the haptics must be reinserted into the eye and refixated with a new needle pass. If the scleral tunnels are of different lengths, one or both haptics can be trimmed and recauterized to improve centration. 1. Yamane S, Sato S, Maruyama-Inoue M, Kadonosono K. Flanged intrascleral intraocular lens fixation with double-needle technique. Ophthalmology. 2017;124(8):1136-1142. By John A. Hovanesian, MD The Yamane technique is a learnable technique that almost any cataract surgeon can adopt without the need for a lot of additional equipment or tools. It can be used with a number of different IOLs, but I typically prefer to use the CT Lucia 602 because, in my experience, this lens is well-suited to the technique. The hardest part of the procedure, in my opinion, is directing the haptics into the ends of the needles. When externalizing the haptics, you can do both at the same time or each separately. Once the haptics are externalized, you need to ensure that the IOL does not get pulled back into the eye. I like to blunt the tip of the haptic quickly with low-temperature cautery to prevent it from reentering the eye. To do this, I use nontoothed forceps in one hand to grasp the haptic and the cautery instrument in the other hand to blunt the tip of the haptic. Don’t touch the cautery to the tip of the haptic—just get close enough that the end starts to melt into a little ball. The ball should be about twice the width of the haptic. After the tip of the haptic has been cauterized, it won’t slip back inside the eye. Diametrically opposite needle entry points—in an eye with a centered pupil—are essential for achieving IOL centration with this technique. The best tip I have heard is to use the Yamane Double-Needle Stabilizer (Geuder), which helps to ensure that your needle groups are aligned. I have not used this device myself, but I have heard from many colleagues that it is extremely helpful. Basically, the way the instrument works is that you rest it on the eye and then advance the needle through it, resulting in just the right angle. The instrument indicates the right direction on the needle, so that you end up with better geometry. By Alanna Nattis, DO, FAAO Instability of the capsular bag, violation of the posterior and/or anterior capsule, and loss of lens fragments are, thankfully, uncommon complications during cataract surgery. Nevertheless, because of the possibility of these complications, we need alternative methods of placing and fixating an IOL. Since its introduction in 2014, the Yamane technique has provided an important and elegant method of IOL fixation.1-5 As in any surgical procedure, proper preparation and the ability to adapt and make small alterations in technique help to ensure efficient and successful IOL fixation. For assistance in learning this challenging technique, mentorship, skills workshops, and adjunctive guidance from videos on Eyetube can be great resources. Cataract surgeons performing the Yamane technique should be comfortable with performing vitrectomy—both anterior and pars plana—as it is critical that the IOL and/or surgical instruments do not become entangled with vitreous.1-5 Additionally, adjusting one’s seating position may be helpful during the haptic-docking part of the surgery, to facilitate smooth maneuvering of the IOL. Precise IOL fixation is key in this technique; use of a toric marker and calipers to help mark 0° and 180° needle insertion sites can be useful.1-5 It can also be helpful to perform initial cases with an assistant or even a retina surgeon present to help perform a safe, comprehensive vitrectomy prior to IOL fixation. If you have any doubt that you may not be able to perform the procedure successfully, there is no harm in referring the case to a surgeon with more experience, if it is felt that this would lead to a better outcome. 1. Mughal M, Shah SP. The Yamane technique optimized. Retina Specialist. July 20, 2019. https://www.retina-specialist.com/article/the-yamane-technique-optimized. Accessed January 17, 2020. 2. Yamane S, Sato S, Maruyama-Inoue M, Kadonosono K. Flanged intrascleral IOL fixation with double-needle technique. Ophthalmology. 2017;124(8):1136-1142. 3. Rocha K. Troubleshooting Yamane: Top tips for intrascleral haptic fixation—and its application in complicated cornea cases. The Ophthalmologist. June 27, 2018. https://theophthalmologist.com/subspecialties/troubleshooting-yamane. Accessed January 17, 2020. 4. Riaz K. Yamane technique for IOL fixation in the absence of capsular support. Cataract & Refractive Surgery Today. October 2018 (suppl). 5. Kim DB. The next big thing in scleral haptic fixation. Cataract & Refractive Surgery Today. October 2017. By Kamran M. Riaz, MD Here are some helpful tips for those thinking of adopting the Yamane technique. Given the need for precise placement of the docking needles, I treat this procedure as though I were placing a toric IOL. Preoperatively, with the patient in the sitting position, I mark the eye at the 3, 6, and 9 clock positions, to account for likely cyclotorsion. At the start of the case, I use a toric marker to reinforce the 3 and 9 clock positions, as these will be critical marks to use for the 2-mm measurement posterior for the docking points of the needles. Figure 7 shows suggested locations for the corneal and scleral tunnel incisions. I make my main incision slightly to the left of the 12 clock position. This allows me to grasp both the leading and trailing haptics of the IOL slightly more easily and ergonomically, as the IOL will settle in a more favorable position with this left-leaning incision. The paracentesis wounds should be made just superior to each of the previously placed marks. Figure 7. Suggested locations for corneal and scleral tunnel incisions. Courtesy of Kamran M. Riaz, MD I mark 2 mm posterior for the dive point and then 2 mm counter clockwise for the entry point. I make the entry point slightly closer (< 0.5 mm) to the limbus to allow the curve of the IOL to adjust. When the 30-gauge needle (TSK Laboratory) enters, I tunnel slightly away from the limbus and then dive into the eye. Although IOL power calculation is as important as in any cataract surgery, the choice of IOL when the Yamane technique is used is especially consequential. In particular, the material construction of the haptics may dictate whether cautery is successful. Generally PVDF haptics are amenable to cautery and will consistently form the desired shape. In the United States, only one IOL with PVDF haptics is available, the CT Lucia 602. One can also use a standard three-piece IOL with acrylic haptics, but the procedure may be extremely challenging—especially for surgeons who do not perform many of them—and fraught with potential problems during intraocular manipulation, such as a kinked haptic causing malpositioning or even a haptic-optic break with posterior migration of the IOL. To match the outer diameter of the haptics, the inner lumen of the needle must be sufficiently large to adequately dock the haptics. A 25- or 27-gauge needle may be a consideration, although these would require the use of a correspondingly large scleral tunnel wound that may leak postoperatively. I use a 30-gauge needle constructed with a thin wall (TSK Laboratory). This is the only needle I am aware of that has an inner lumen of sufficient diameter to enable externalizing the IOL haptics. A regular 30-gauge needle will not work. Threading the haptics into the needle lumen is a delicate maneuver. This work is greatly facilitated by using microforceps (25-gauge or smaller) with either a horizontal grasping action (most popular) or overhand vertical grasping. Both types of forceps work well, but the overhand vertical forceps may make the ergonomics easier. I prefer Shah forceps (Vitreq/Beaver-Visitec International). These disposable 27-gauge microforceps are constructed with a small needle-shaped tip, yet they provide sufficient grip of the haptics during delicate maneuvers. Use of anterior or posterior chamber infusion is essential for maintaining adequate working space inside the eye. If I am working with a retina colleague, I like to have the infusion left in place inferiorly. When I work as a solo surgeon, an anterior chamber maintainer helps immensely. There is debate among surgeons who perform the Yamane technique about which haptic to externalize first. Traditionally, the leading haptic is first, but a growing number of surgeons advocate externalizing the trailing haptic first. The trailing haptic is typically more difficult than the leading haptic, so the thought is to do the difficult haptic first and then work on the easier one. Surgeons who have had difficulty externalizing the trailing haptic second may want to consider switching for their next cases. Once the needle is placed in the eye (either one), it may be easier to fixate the haptic and move or rotate the needle to thread the haptic, rather than solely relying on hand-holding the haptic with microforceps to thread the needle. A gentle rotation of the needle may facilitate threading of the haptic. When the trailing haptic is externalized second, the second needle can be used to nudge the IOL away from the surgeon while simultaneously the trailing haptic is grasped and then the needle is threaded. This may create a favorable angle to thread the slightly more challenging trailing haptic. By Karolinne Maia Rocha, MD, PhD Sutureless intrascleral fixation of a posterior chamber IOL in the setting of a compromised posterior capsule has become a popular surgical technique because of the procedure’s shorter duration and reduced risk for intraoperative complications compared with previous options. The intrascleral posterior IOL fixation with double-needle technique has a favorable safety profile,1,2 but a new set of intraoperative skills is needed in order to master the technique. Here are some key steps and a modified approach3 to help you optimize the procedure. Perform conjunctival marking using a toric marker and calipers. To assure precise haptic placement, mark the limbus at the 6 and 12 clock positions using a toric marker and place a secondary mark 2 mm from the limbus. From the inferior mark, measure and place a third mark 2 mm inferonasally, and from the superior mark, measure and place a fourth mark 2 mm superotemporally. The haptics of the three-piece IOLs routinely used for secondary implantation are made of PMMA. With these IOLs, the trailing haptics are susceptible to breakage or bending during manipulation. IOLs with PVDF haptics are the best choice for performing this technique, as they are easier to maneuver within the anterior chamber and less susceptible to breaks. Verify that the IOL haptic fits into the thin-walled 30-gauge needle (TSK Laboratory) before inserting the needle into the anterior chamber. Mount the TSK needle on a tuberculin syringe and bend it approximately 75°, bevel up. Create two angled scleral tunnels parallel to the limbus at the marked locations and externalize the haptic using microforceps. A short scleral tunnel may result in IOL dislocation, whereas a long tunnel can lead to intraoperative distortion of the cornea. The bevel should face the direction of the haptic approaching the needle to assist its passage through the needle. Once both haptics are externalized, mark the tips 1 mm from the end using calipers before performing cauterization. This ensures that the flanged haptics are symmetrical and decreases the risk of tilt and decentration. Next, fixate the cauterized flanges into the scleral tunnels. Small flanges risk IOL dislocation, especially during wound healing, and larger flanges are difficult to push into the scleral tunnel and have a higher risk of postoperative extrusion. 1. Yamane S, Inoue M, Arakawa A, Kadonosono K. Sutureless 27-gauge needle-guided intrascleral intraocular lens implantation with lamelar scleral dissection. Ophthalmology. 2014;121:61-66.
2. Yamane S, Sato S, Maruyama-Inoue M, Kadonosono K. Flanged intrascleral intraocular lens fixation with double-needle technique. Ophthalmology. 2017;124(8):1136-1142.
3. Rocha KM, Gouvea L, Milliken CM. Combined flanged intrascleral intraocular lens fixation with corneal transplant. Am J Ophthalmol Case Rep. 2018; 13:1-5. By Steven G. Safran, MD For me, the most important aspects of the Yamane technique are ensuring an adequate vitrectomy and placing an infusion cannula. I always use a trocar and perform a pars plana vitrectomy when performing the Yamane technique. The vitrectomy is essential because I am going to be maneuvering behind the iris, and I don’t want to be disturbing the vitreous. Additionally, the vitreous must be adequately and completely removed. Even if the eye has had a vitrectomy previously, I make sure that it was adequate and that all vitreous was removed. An infusion cannula should be in place to control IOP because I don’t want to be sticking needles into a soft eye. Doing so will increase the risk of bleeding and choroidal hemorrhage. It is helpful to use an infusion line that is under footpedal control, so that it can be turned on and off as needed during the procedure. I use the CT Lucia 602 IOL because this lens has PVDF haptics, which are robust and do not kink or break easily. Additionally, even when the haptics of this IOL have been bent acutely, they return to their original configuration. Controlling the entry point into the eye and the length of the tunnels is vital for this technique. It’s important to mark the patient carefully and to make sure that the marks are exactly 180° apart and exactly the same distance from the limbus, and that the tunnel length and angle of entry are symmetric. If anything is off, the IOL will be decentered. I put both of my marks exactly 2 mm behind the limbus. Each tunnel should be about 1 to 1.5 mm in length. An infusion line is useful when making the tunnels. If the eye is at a constant and firm IOP, I can control the tunnel length and there will be less bleeding. I enter a little acutely with the needle, then create the tunnel, then enter acutely again. The tunnels should be more or less parallel to the limbus; they can be angled ever so slightly posterior, about 5° away from the limbus, but no more than that. For a myopic patient, I may angle the tunnels a bit more than 5°, and a bit less if the patient is hyperopic. This is because the bigger the eye is, the less haptic there will be to work with. The next step is to feed both haptics into the needles. I feed one haptic into one needle, let go of it, then move to the second needle, feed that haptic in, and then rotate them simultaneously. I pull both needles out of the eye at the same time, and as I do that both haptics come out of the eye at the same time. When I do it this way, the lens has to rotate. If the lens doesn’t rotate, then one haptic will pull out, but the other haptic won’t come out because it hasn’t rotated. But if both haptics are rotated by extracting both at the same time, the lens will rotate and both haptics will come out at the same time. With a 30-gauge needle, the haptics will not slip back into the eye. I can just pull the haptics out, let go, and the haptics won’t go anywhere. Next I grab both haptics with the forceps and push them so that each side is only a little bit out, to see if the lens is centering the way I want it to. If I’ve done everything symmetrically, the lens should center. If it looks like it’s going to center well, I do a small haptic melt on each side and push it into its tunnel, and I’m done. The haptic melt should not be too big. If it is too big, it will sit on the surface of the eye and not go into the tunnel. I just make a little mushroom tip, and that can be pushed into the tip of the tunnel. Inject OVD before performing the vitrectomy. A vitrectomized eye will not hold an OVD; it will just drop into the back of the eye. I inject dispersive OVD into the eye using the iris and vitreous as a kind of backboard that allows me to press the OVD up against the cornea and create protection for the cornea. In the vitrectomized eye, the IOL will serve as the backboard. Use self-sealing incisions. Self-sealing incisions are important for the Yamane technique—and any other technique, for that matter. If the eye is leaking, the surgeon will not have control. I make sure that my incisions—even larger incisions—are fashioned so that when I put the infusion line in, they seal themselves or close off. A redock is my last resort. After I pull both haptics out, I test the centration and tilt of the optic by manipulating the haptics so that there is an equal amount of externalized haptic—about 1 to 2 mm on each side. If everything has been done symmetrically, the lens should center well at this point, and if it does, I will go ahead and melt the haptic tips and be done. If, on the other hand, there appears to be some tilt or decentration, I pull one haptic out a bit more than the other to see if I can compensate and center the IOL. If that does not fix the problem, I melt the side I consider the most optimal and redock the other side. What I mean by redock is that I will create a flange on one side to secure it and I make another needle path with the 30-gauge needle, designed to correct for whatever centration or tilt issue is present by compensating for the asymmetry causing the positioning problem. For example, I may make the second pass more anterior, posterior, nasal, or temporal to the first pass as indicated by the centration or tilt issue to compensate for it and thereby fix the problem. After creating a new needle pass, I pull that externalized haptic back into the eye and dock it again in the lumen of the needle once to externalize it again and create a new haptic position. I refer to this process as redocking. I do this on one side in about 30% to 40% of my cases because I want excellent centration, and with this maneuver I am usually able to improve the lens position to achieve that. Perform peripheral iridotomy using the vitrector or after the IOL is successfully fixated. This is an important step in order to prevent reverse pupillary block. I generally put the peripheral iridotomy temporally. By Manjool Shah, MD As a glaucoma and complex anterior segment specialist, I am aware that some IOL fixation techniques can cause real problems. Specifically capsule-independent IOL fixation runs the risk of resulting in uveitis-glaucoma-hyphema (UGH) syndrome, which is purely iatrogenic. When the eye is marked for needle passes, one often measures from the limbus, and it is easy to mischaracterize where vital intraocular structures such as the ciliary body are located. Instead, I advocate measuring posteriorly from the scleral spur, which can often be visualized even without making a conjunctival peritomy as the end of the blue zone. The spur, or the surgical limbus, always correlates to intraocular anatomy.1 I routinely place my needle tracks at least 2 mm posterior to the spur, and in this way I avoid running into the ciliary body. Additionally, I try to ensure that the needle is perpendicular to the surface of the sclera, which keeps the internal entry at the same distance from the spur as the external entry. If the needle is angled in the iris plane, there is risk of the internal needle entry emerging relatively anterior, again putting the ciliary body and posterior iris at risk for IOL-induced chafe. Another key pearl for any scleral-fixated IOL procedure is to place a peripheral iridotomy. In eyes lacking capsular and zonular stability, the iris can exhibit a great degree of iridodonesis, increasing the risks of intermittent contact between the IOL and the iris, reverse pupillary block, and even pupil capture of the optic.2,3 A simple iridotomy placed at the time of IOL fixation can mitigate that risk greatly. I typically use a vitreous cutter at a 1 cut per minute rate so I can get a single, small, clean opening. 1. Van Buskirk, EM. The anatomy of the limbus. Eye. 1989;3:101-108. 2. Singh H, Modabber M, Safran SG, Ahmed II. Laser iridotomy to treat uveitis-glaucoma-hyphema syndrome secondary to reverse pupillary block in sulcus-placed intraocular lenses: Case series. J Cataract Refract Surg. 2015;41(10):2215-2223. 3. Singh H, Safran SG, Ahmed II. Laser iridotomy for pseudophakic reverse pupillary block in patients with pupillary optic capture after sulcus-placed intraocular lenses. J Cataract Refract Surg. 2017;43(2):299.
Conclusion

A few pearls for the Yamane technique.
Pearl No. 1
Pearl No. 2
Pearl No. 3
Pearl No. 4
Pearl No. 5

A learnable technique.
Alignment Aid

Consider starting with an assistant.

A thin-walled 30-gauge needle is a must.
Tip No. 1: Pre- and Intraoperative Marking
Tip No. 2: Placement of Incisions
Tip No. 3: Location of Needle Entry
Tip No. 4: IOL Choice
Tip No. 5: Ultrathin-Walled Needle
Tip No. 6: Intraocular Forceps
Tip No. 7: Anterior Chamber Maintainer
Tip No. 8: Which Haptic to Externalize First?
Tip No. 9: Use the Needles To Your Advantage

Key steps and a modified approach.
Marking
IOL Haptics
The Double-Needle Technique
Ensure Proper IOL Centration

Adequate vitrectomy and an infusion cannula are must-haves.
IOL Selection
Marking and Needle Tunnel Creation
Inserting the Haptics
Additional Pointers

Measure posteriorly from the scleral spur, not the limbus.